Introduction
Multi-factor authentication (MFA) is a security process in which users are asked to enter passwords and also verify their identity via SMS or authentication apps when signing in to their accounts. MFA can make your account more secure by reducing the risk of unauthorized sign-ins even if your password has been compromised.
This page provides information about the initial procedures to enable MFA. The outline is as follows.
- Step 1: Set Up the First Verification Method
- Step 2: Add Alternative Verification Methods
- Step 3: Try Signing In
- Step 4: Apply for MFA Use
Procedures on step 1 and 2 differ depending on the verification method you will register. Firstly, select verification methods to register for step 1 and 2, and then tasks to register them are shown below.
Because the primary verification method registered on step 1 is used by default, you should register the method you use frequently for it. You may also register the same method for step 1 and 2; for example, you may register the same authenticator apps installed on your two or more smartphones, or register both your cell phone and landline.
Step 1
Step 2
Microsoft Authenticator
“Microsoft Authenticator” is an MFA authentication application provided by Microsoft. Using this app is convenient since UTokyo Account’s MFA adopts Microsoft’s system. If you have more than one phone, you can register the same authenticator apps on these phones, making them two or more verification methods.
Other Authenticator Apps
If you already use other authenticator apps, such as “Google Authenticator”, you may also use them for your UTokyo Account authentication. If you have more than one phone, you can register the same authenticator apps on these phones, making them two or more verification methods.
Phone Number
You can add your phone number and receive an SMS message or a call (voice guidance) to verify your identity. You can register a different phone number for each “Phone”, “Alternate Phone” and “Office Phone”.
FIDO Security Key
You can use a dedicated device called FIDO security key to authenticate. There are some systems where you cannot use it, so you have to register another method as primary and use them as alternative. For more details, see How to use FIDO security key for Multi-Factor Authentication for UTokyo Account (in Japanese).
Complete all the tasks from Step 1 to Step 4. After you complete the whole procedure, you will be asked to verify your identity with the registered SMS, apps, etc., whenever you sign in to your UTokyo Account. Be well aware that your UTokyo Account will be inaccessible if you lose access to every verification method (smartphone apps, phone number, etc.).
Step 1: Set Up the First Verification Method
First, set up the verification method for MFA. Here, you will add the first verification method only (the second and subsequent methods will be added in Step 2).
The procedure of step 1 differs depending on the verification method you selected. Click the following panels to show the procedure to set up the verification method.
Select an verification method you will register.
Install the “Microsoft Authenticator” app on your smartphone. The Android version is available in Google Play, and the iPhone version is available in App Store.
- Open security info page.
- Input 10-digit Common ID of UTokyo Account and the password on sign-in form if shown.
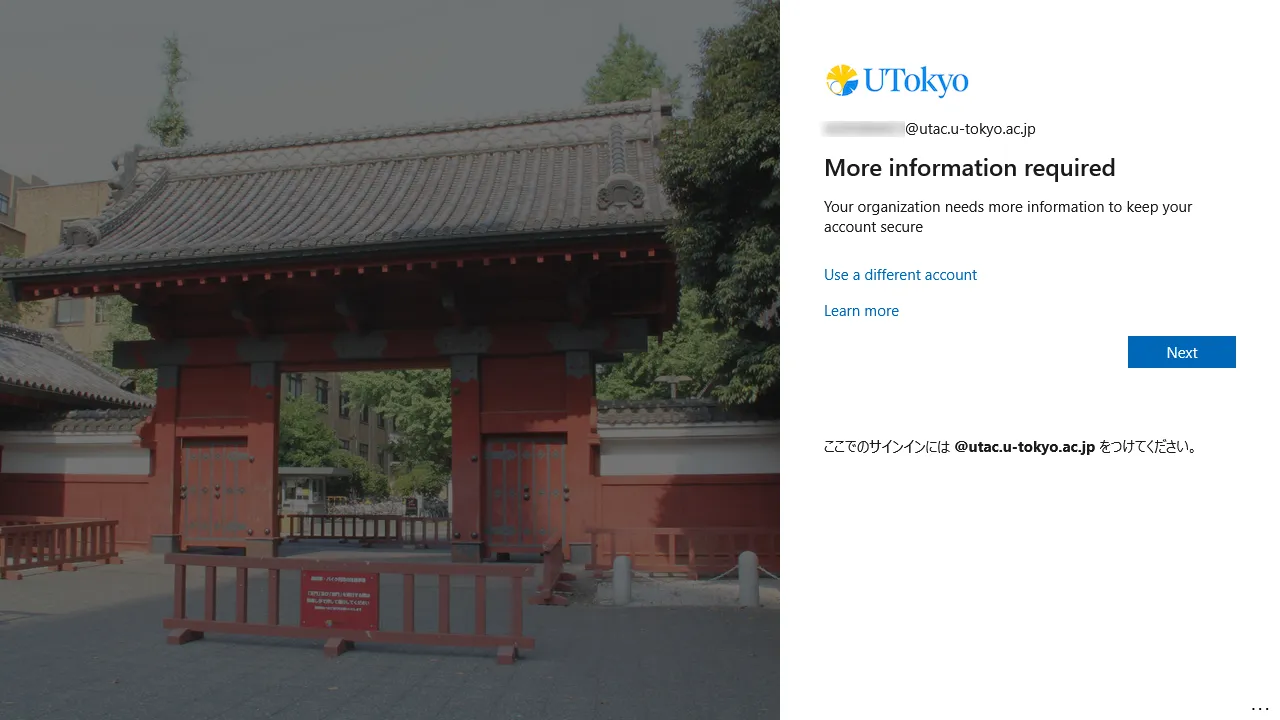
- Click “Next” on “More information required” screen.
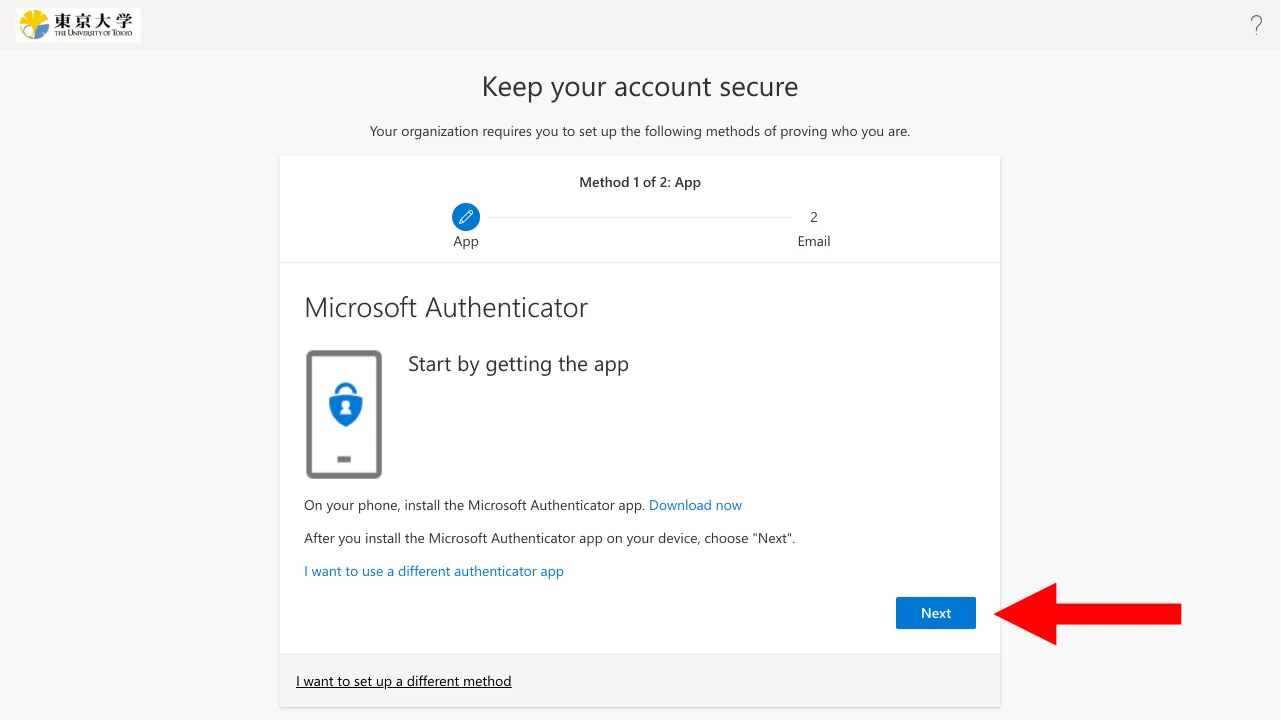
You are required to set up a verification method. By default, Microsoft Authenticator app is selected, so just click “Next”.
The next procedure differs depending on the device that you are using: your smartphone (Microsoft Authenticator app has been installed) or else (PC etc.)
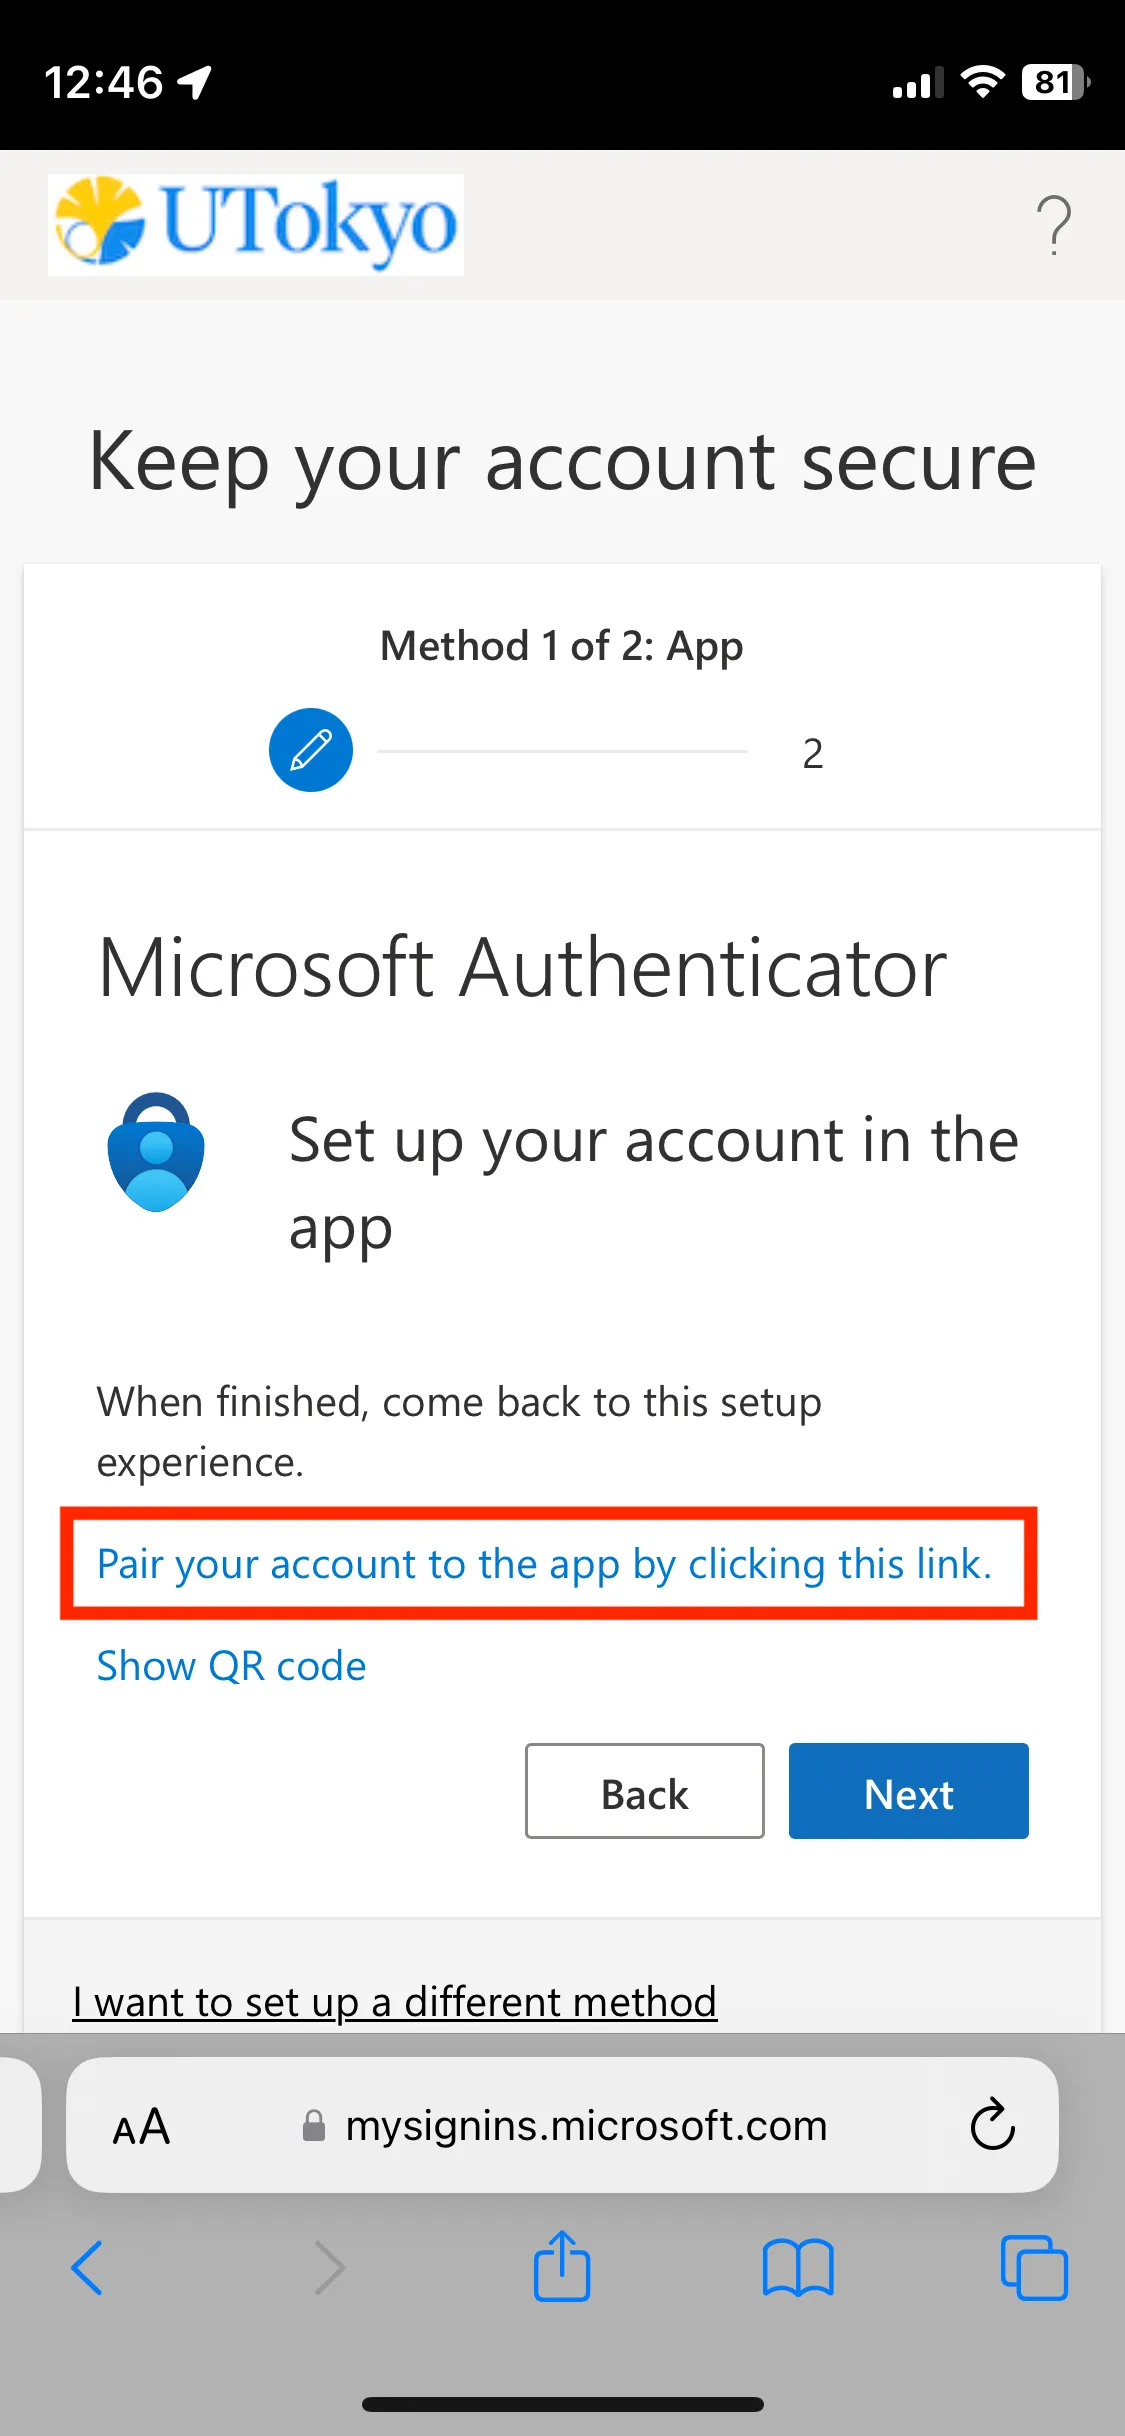
- Smartphone (the same device where you installed the Microsoft Authenticator app): Click “Pair your account to the app by clicking this link”. Check that your UTokyo Account appears in the Microsoft Authenticator app. Go back to the browser and click “Next”.
- Other Devices (PC etc.)
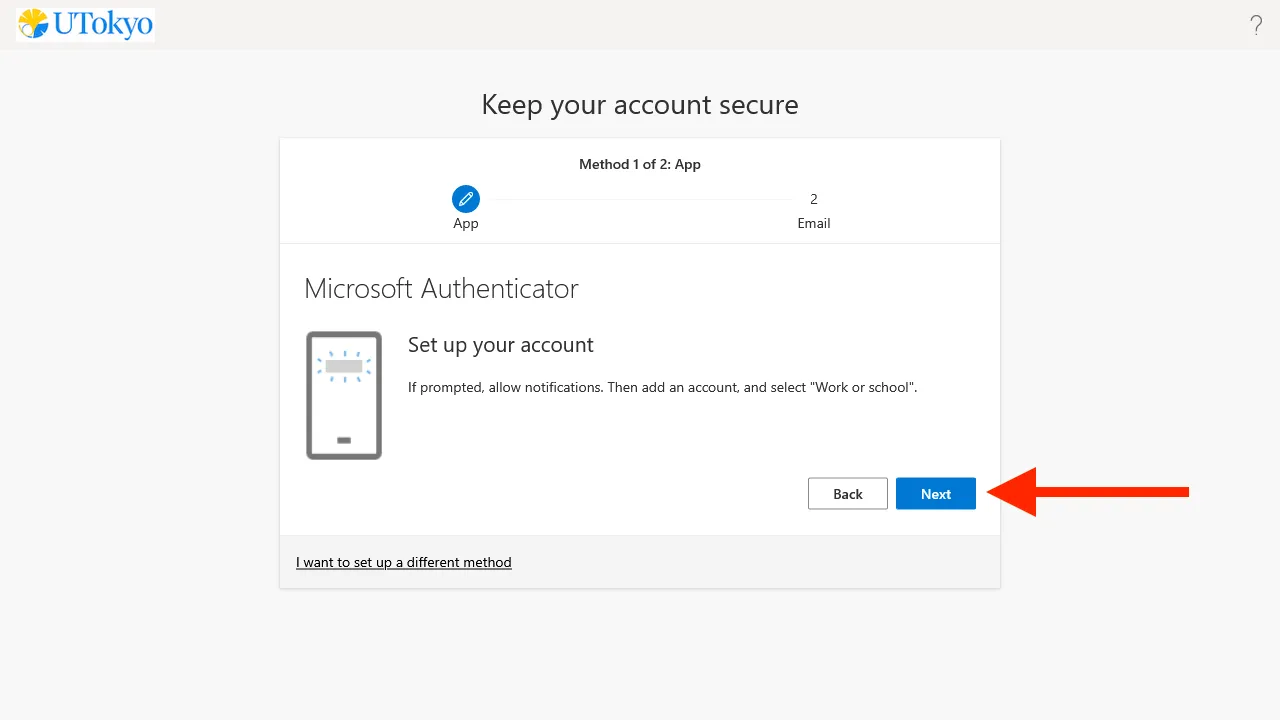
- Click “Next” on “Set up your account” screen, and then QR code is shown.
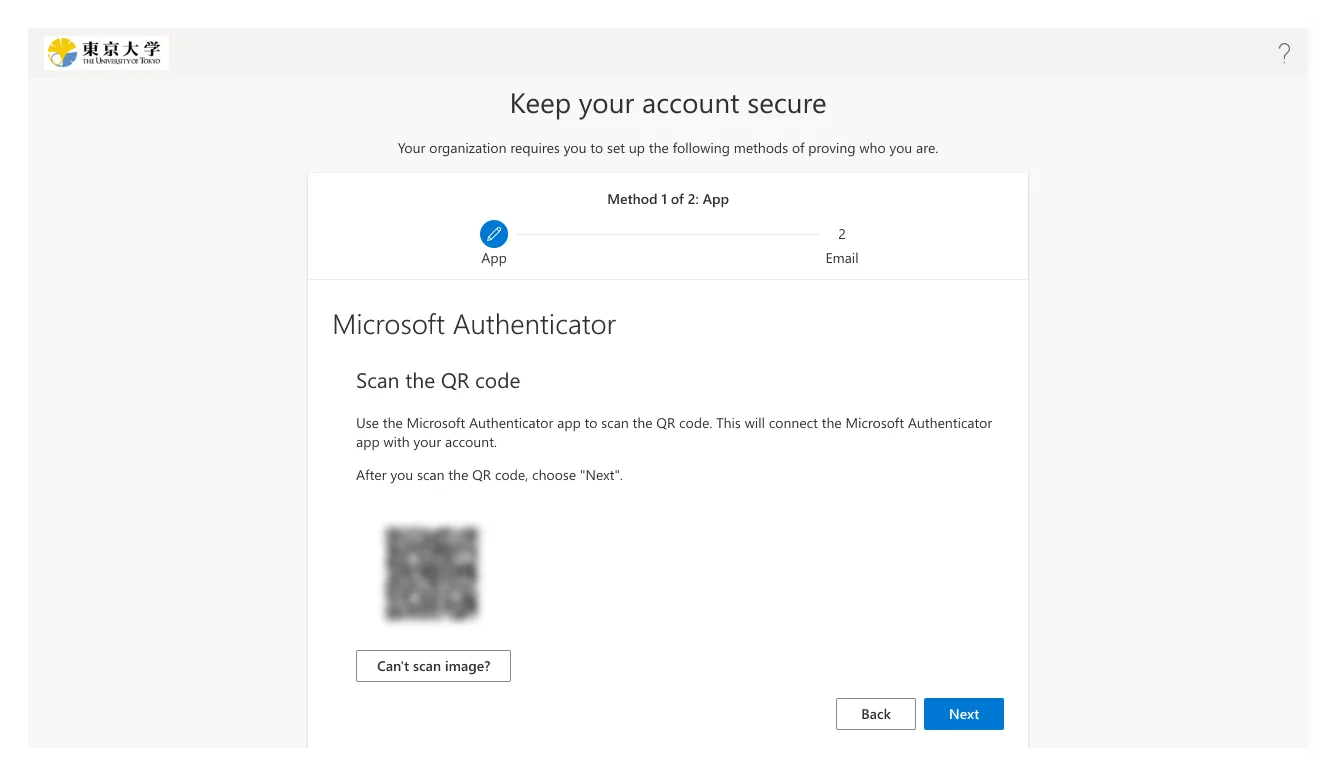
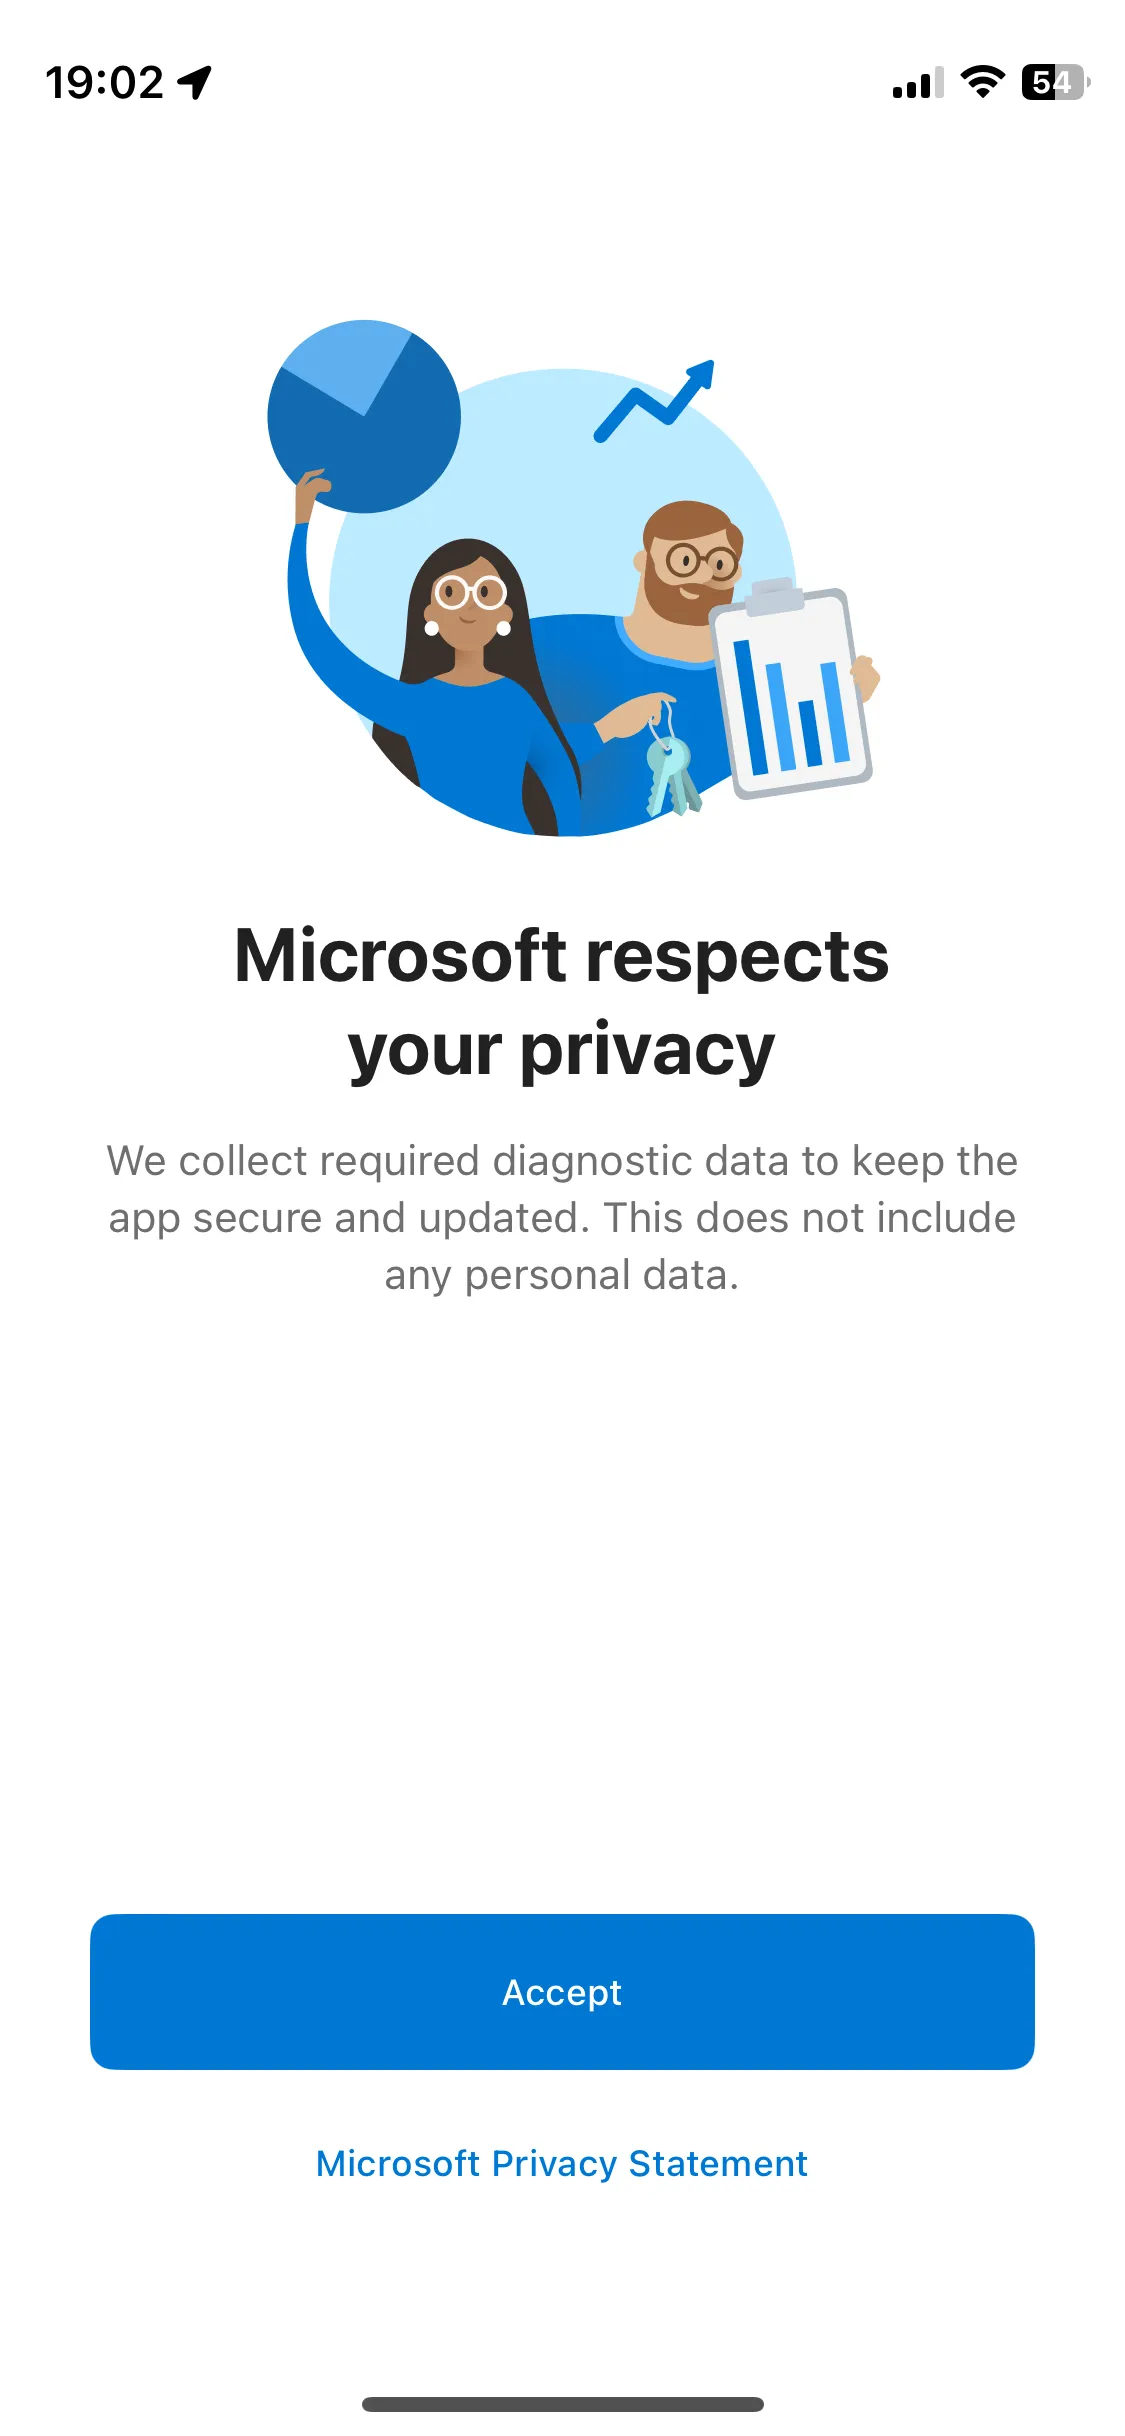
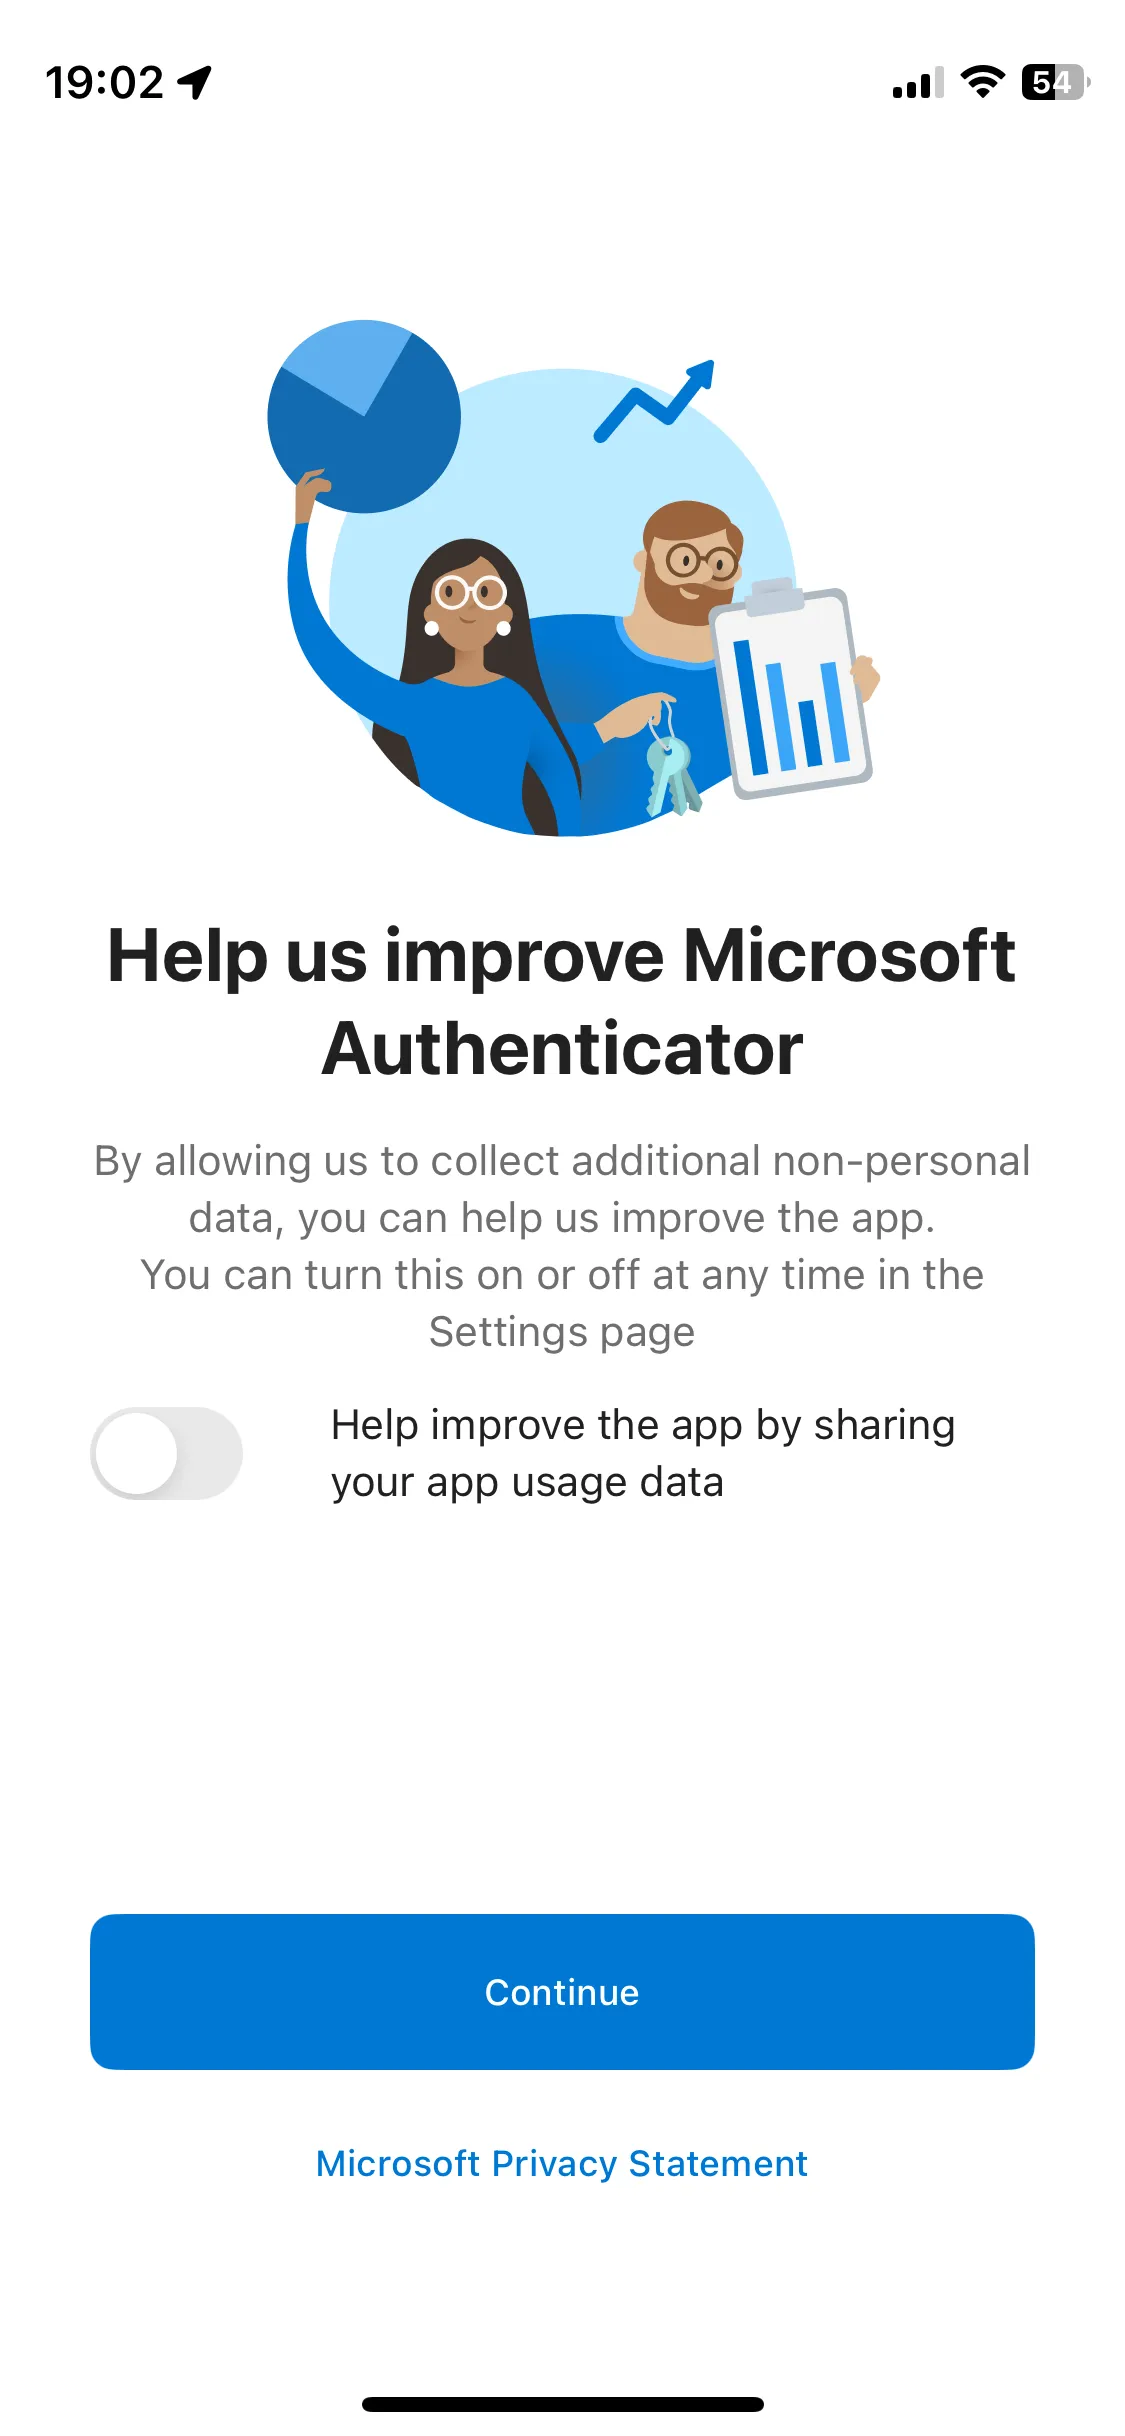
- Open the Microsoft Authenticator app on your smartphone. If you open the app for the first time after installation, you will be asked to accept privacy policy and to select whether to share your app usage data, so follow the instructions.
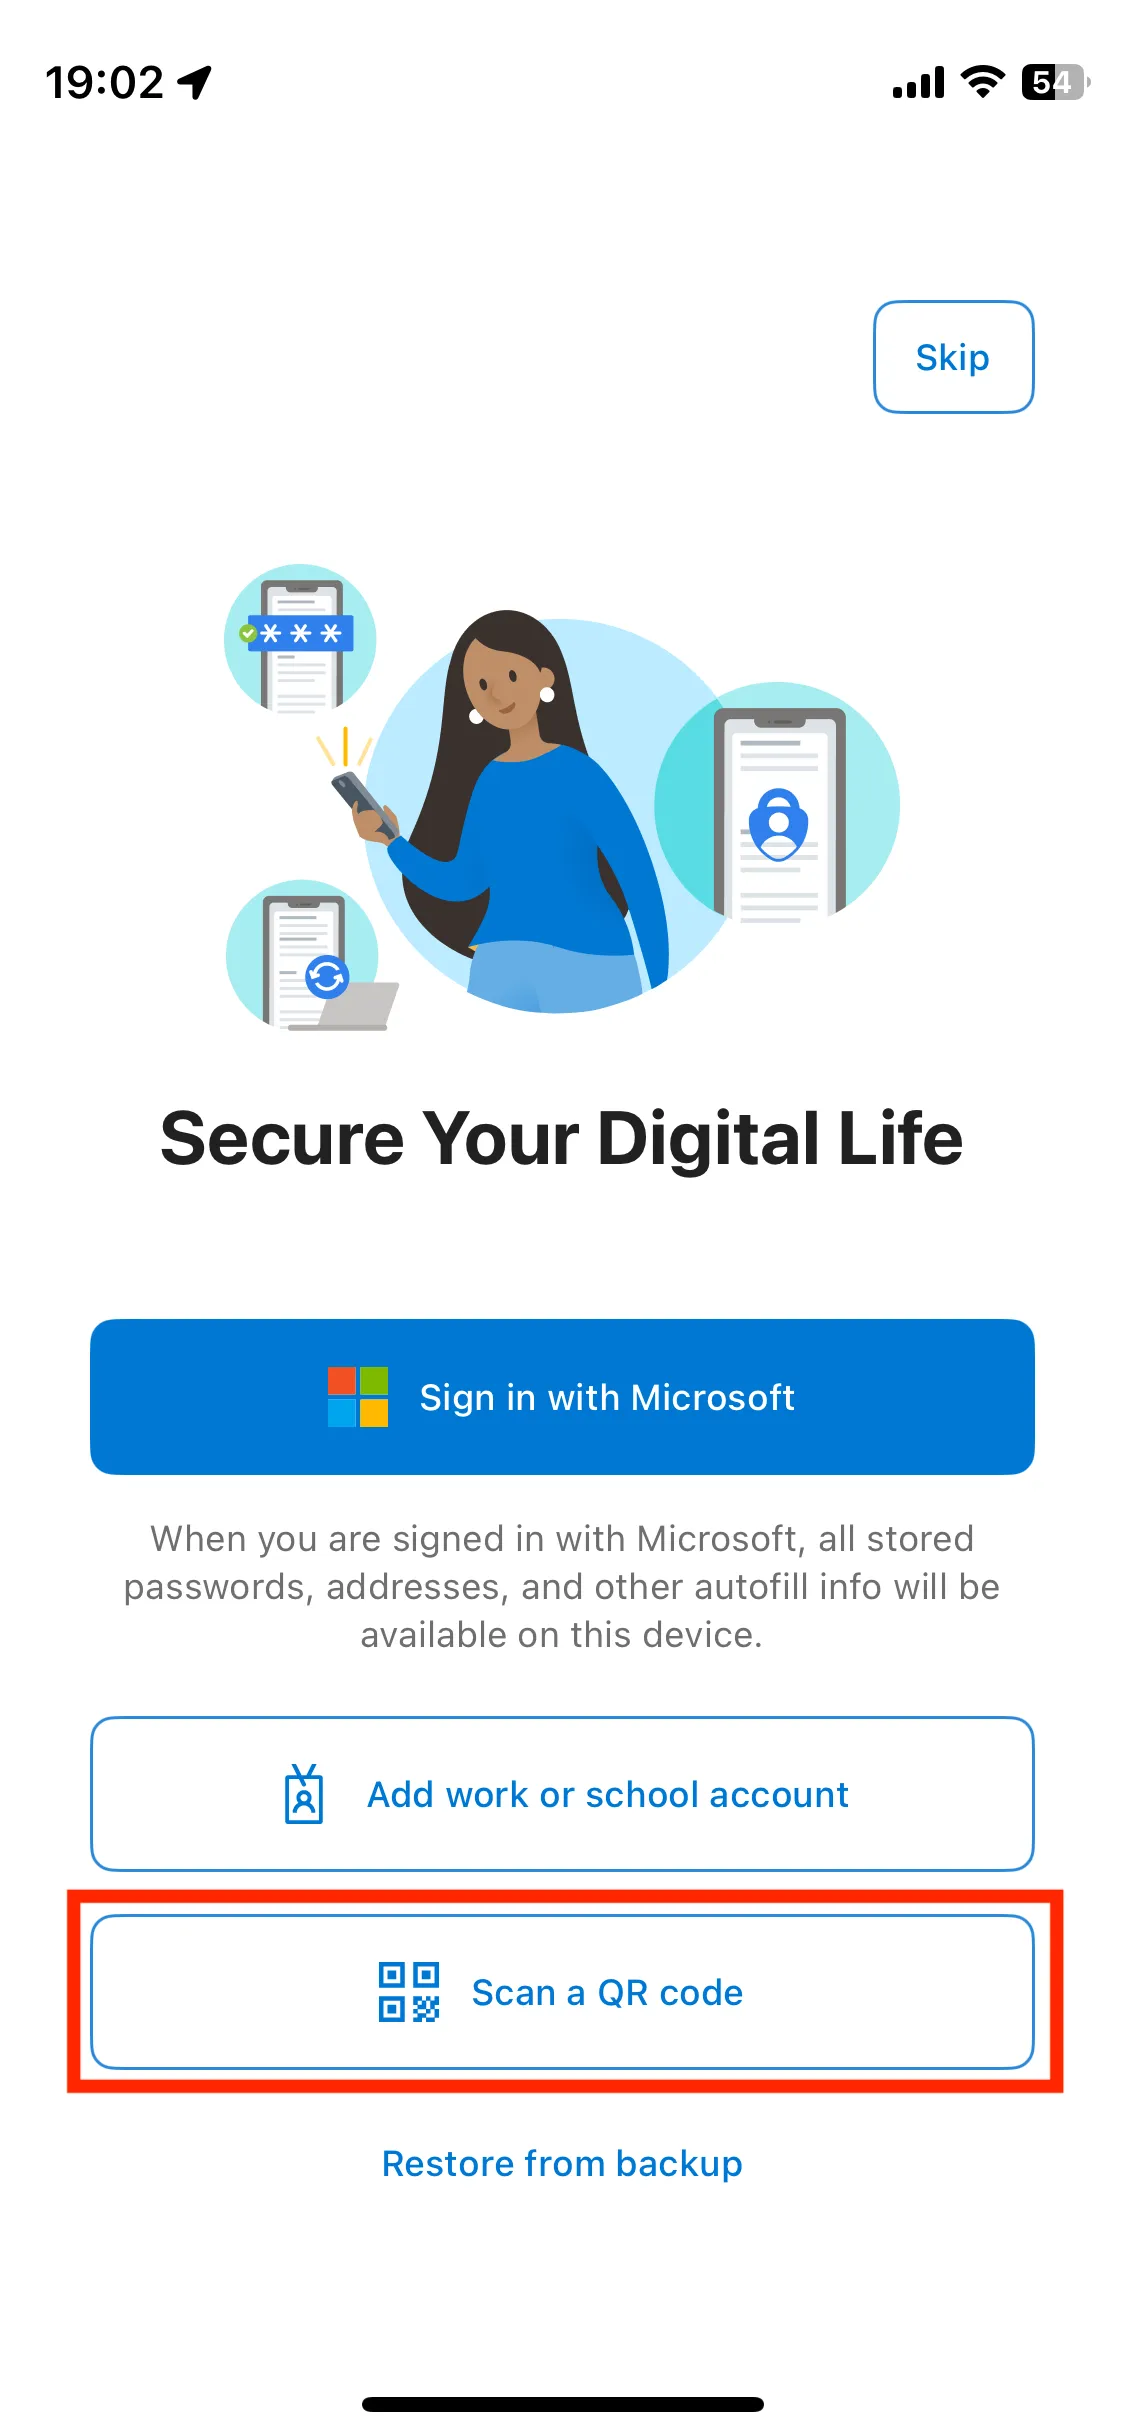
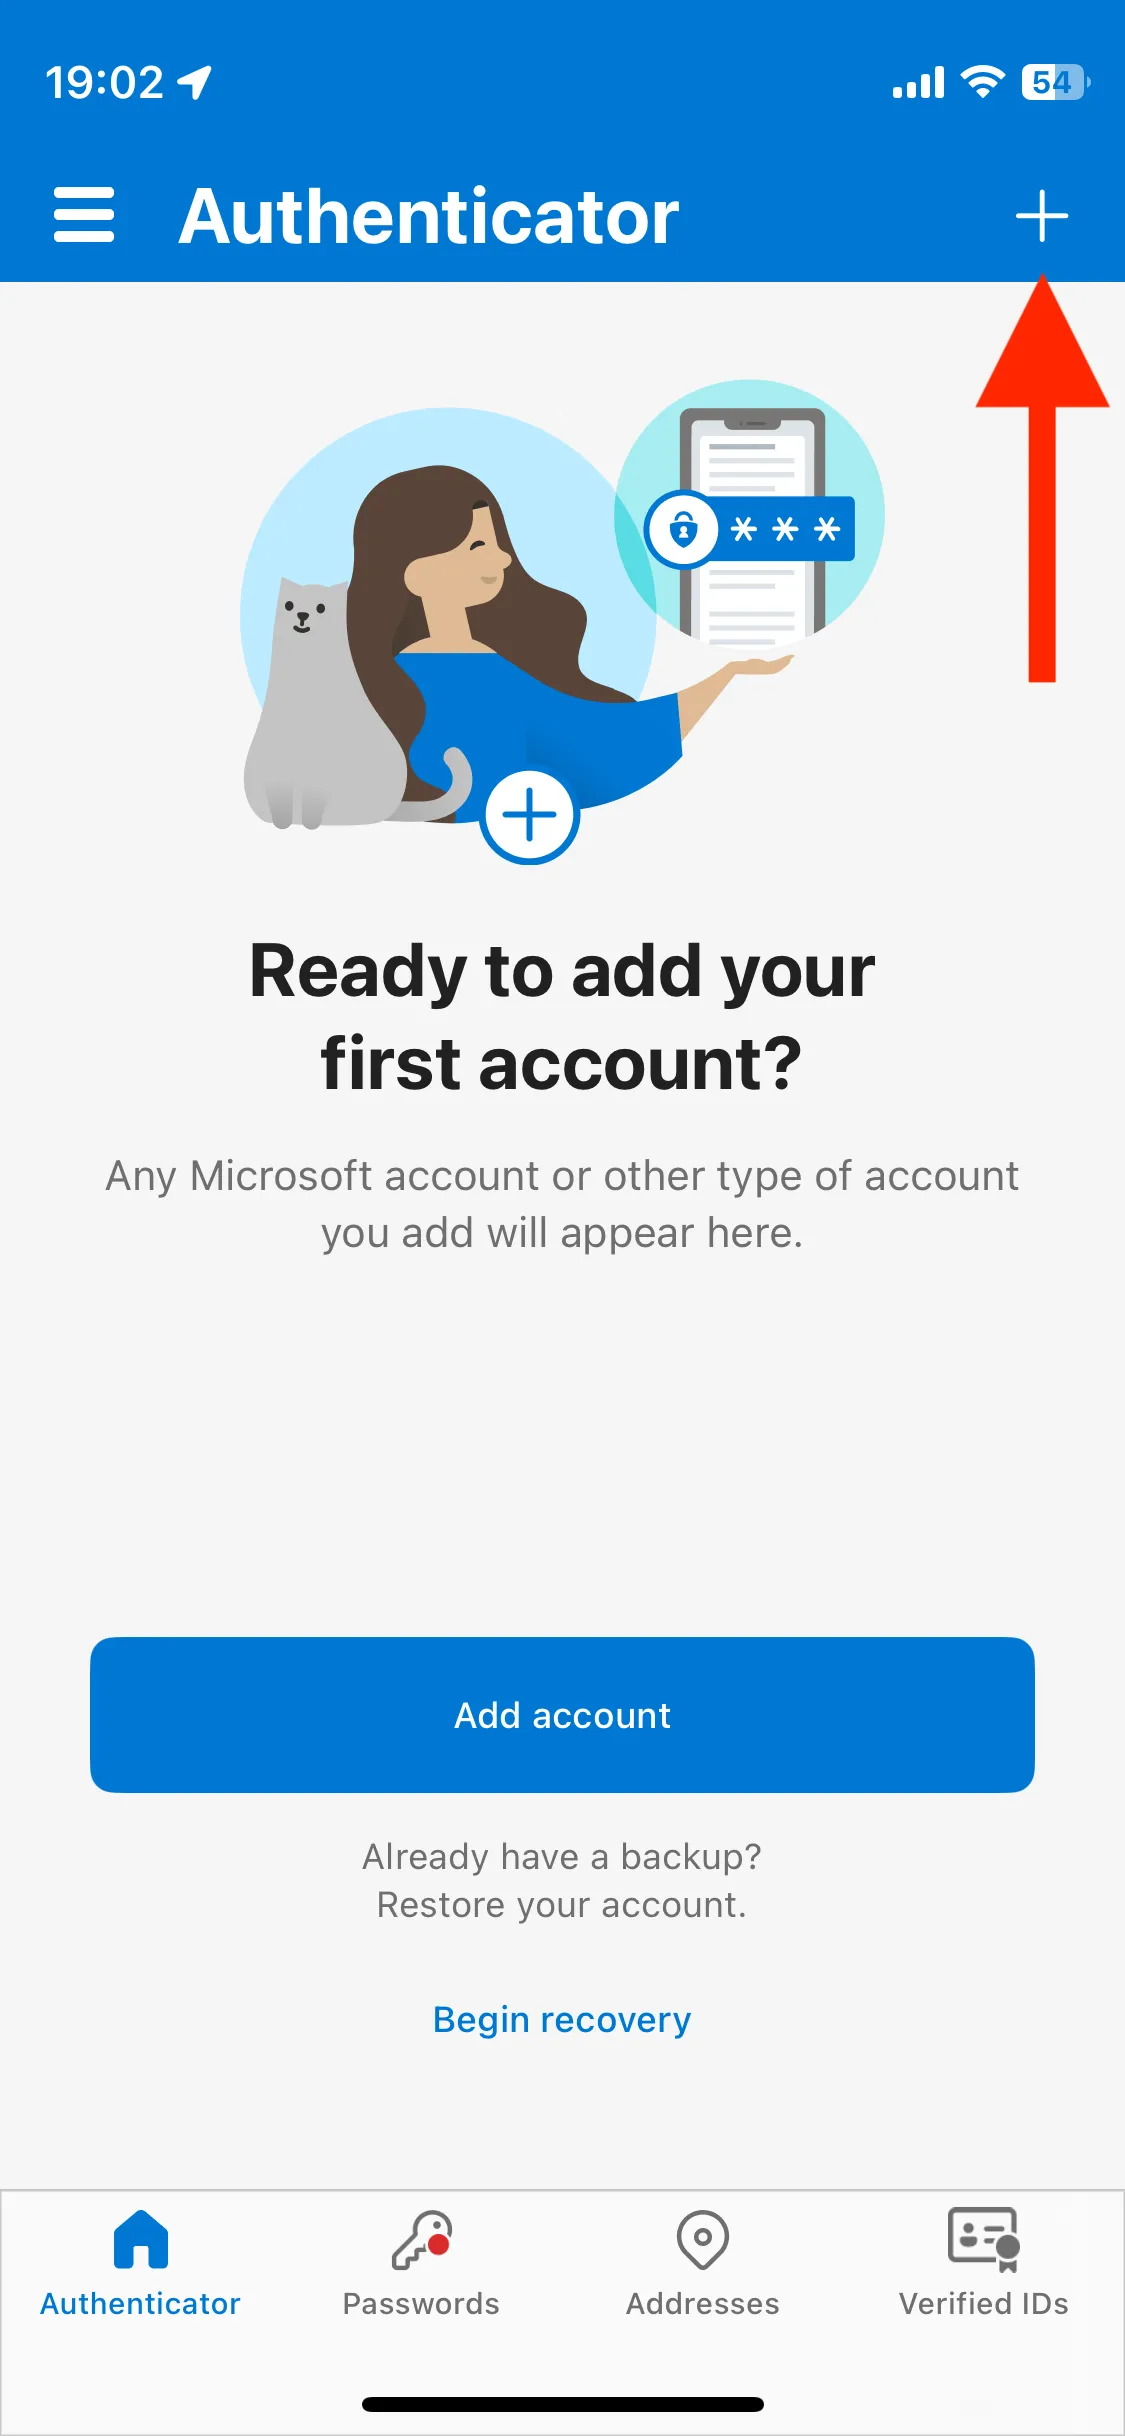
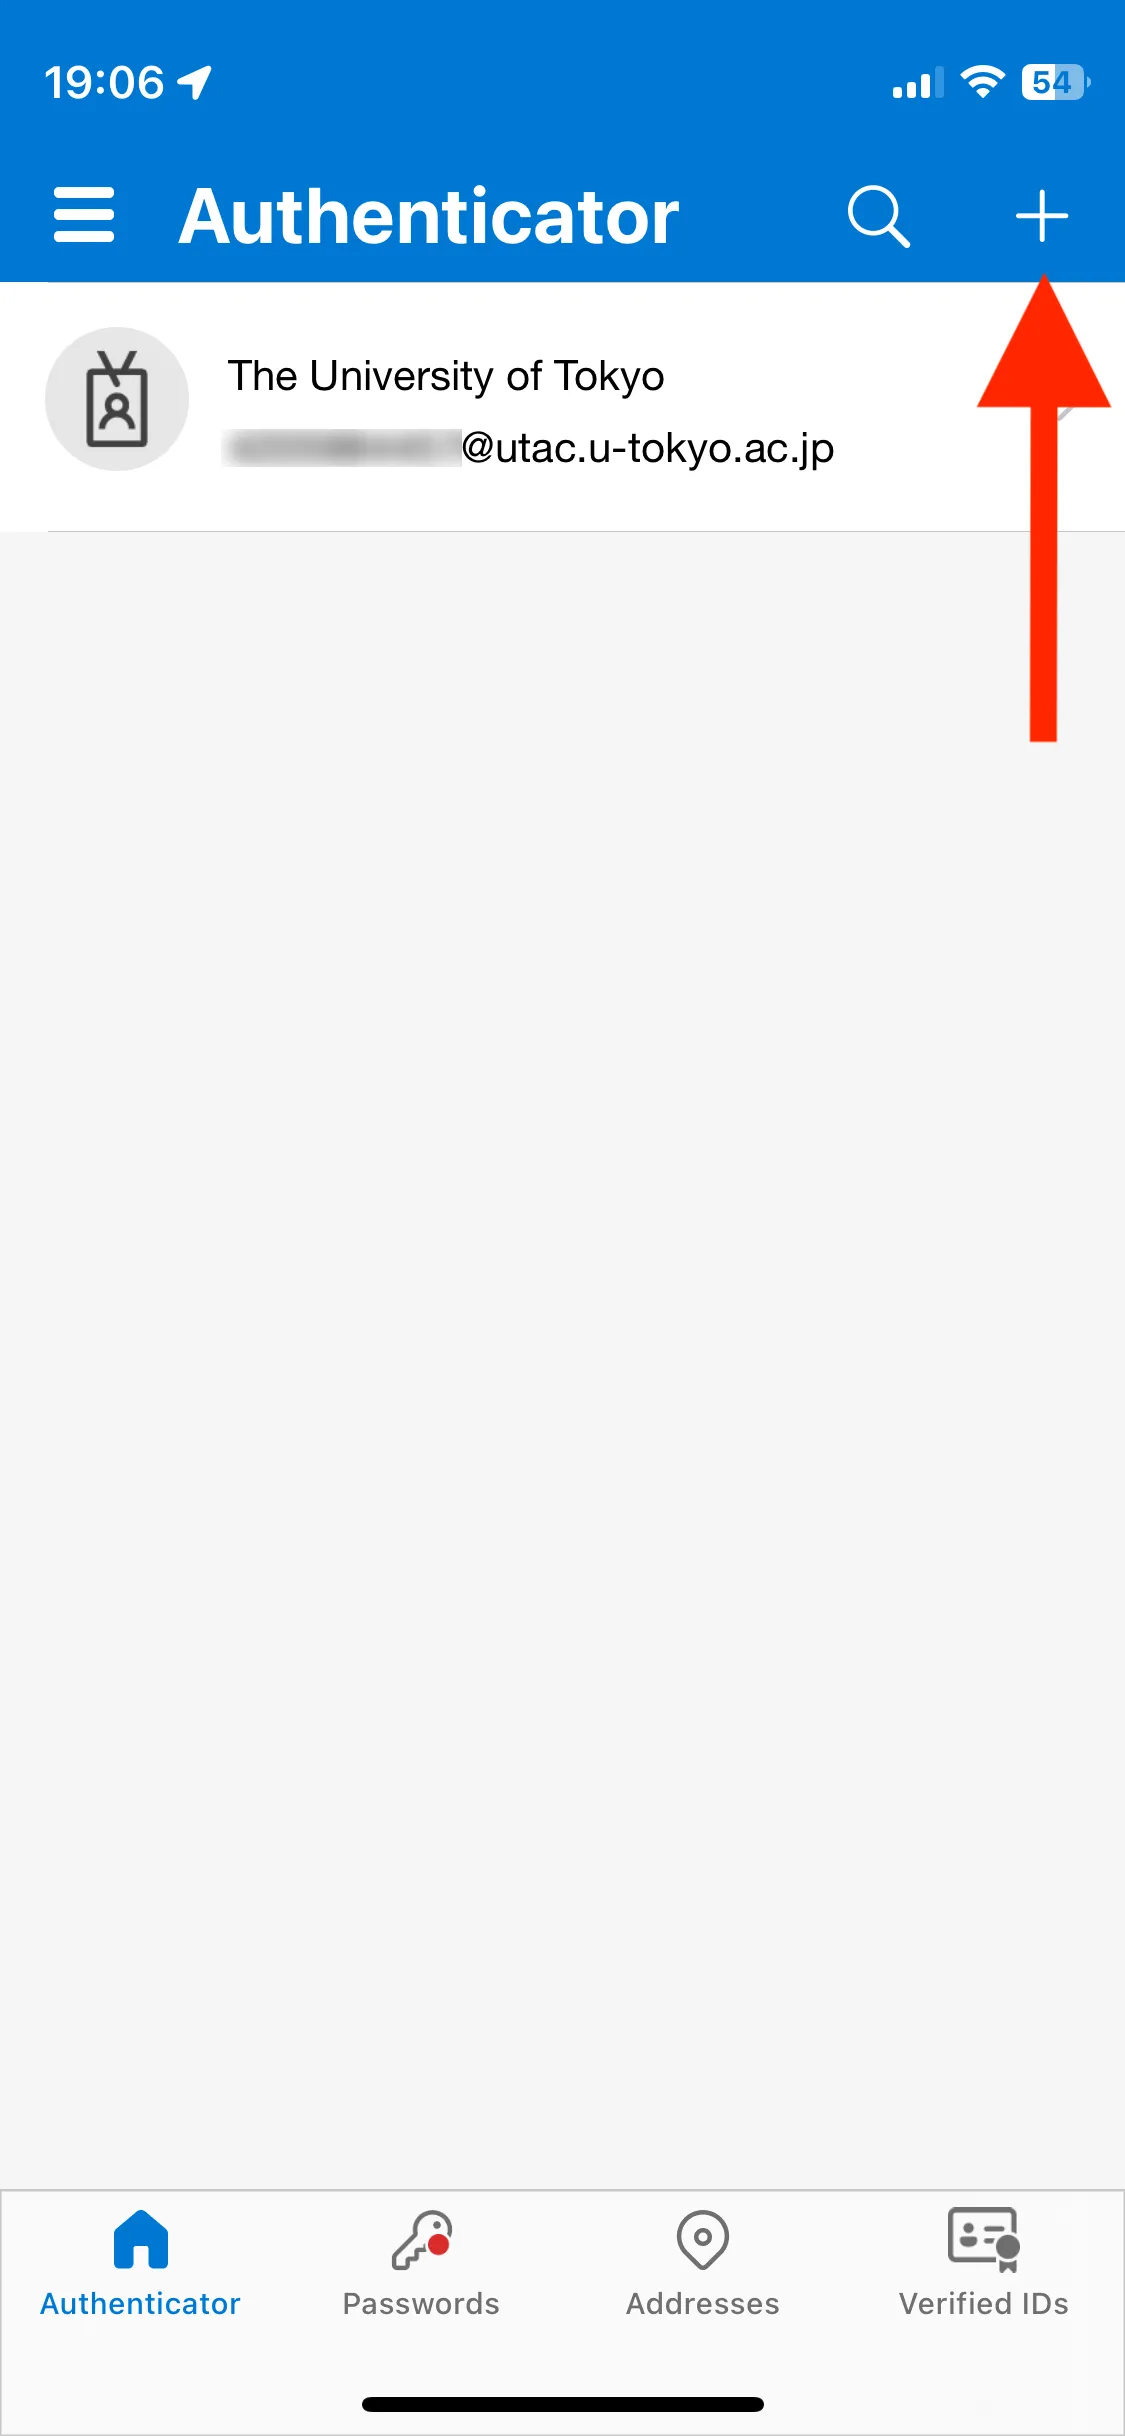
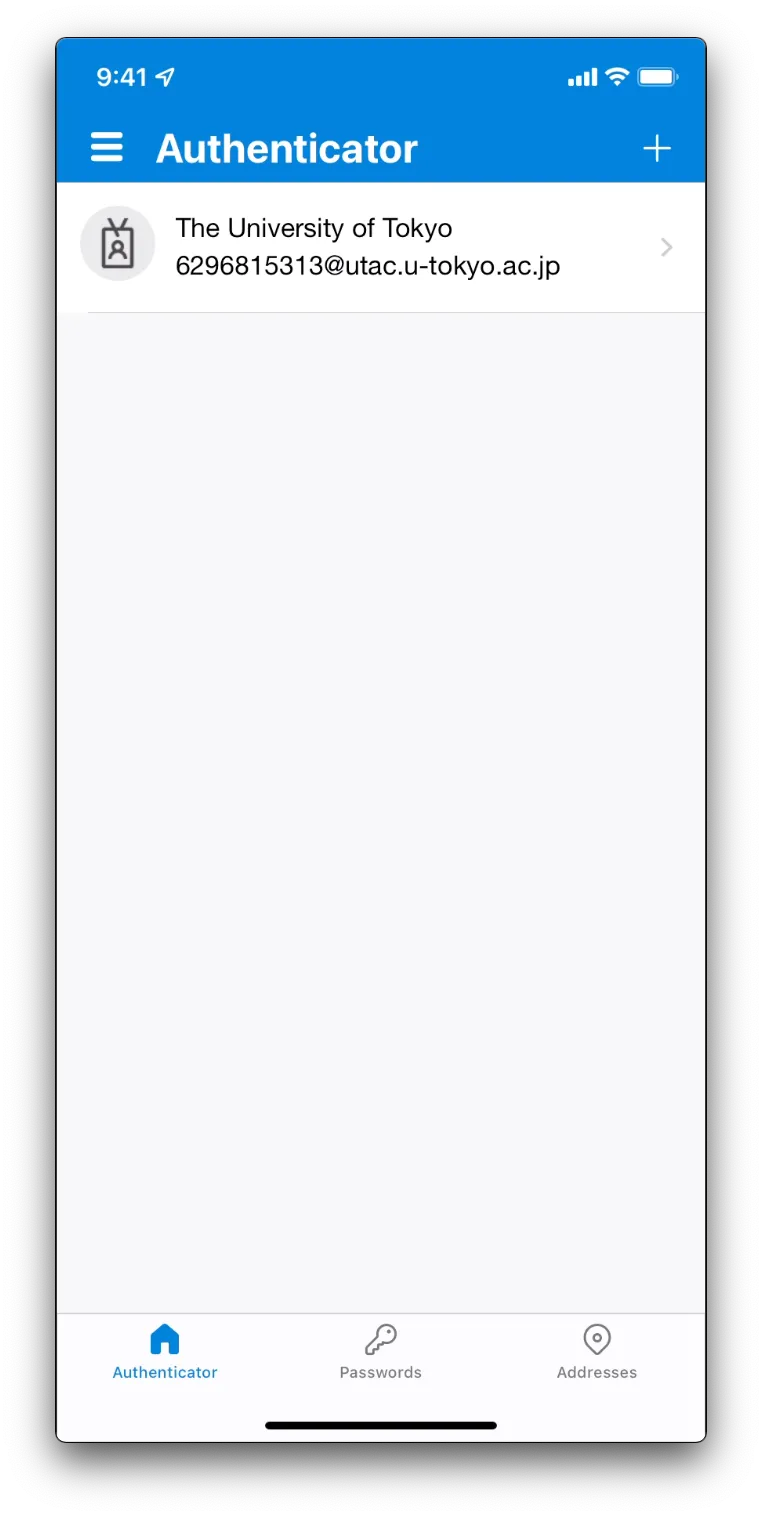
- If “Secure your digital life” screen like the first image below is shown, tap “Scan a QR code”. Instead, screens like the second or third images is shown, tap the ”+” icon in the upper right, and select “Work or school account” and “Scan a QR code” in turn. In all cases, you may be asked to allow the app to access the camera, so then do.
- Scan the QR code with your device’s camera. If you are asked to allow the app to notify, then do.
- After succeeding scan, check that your UTokyo Account appears on the app. Go back to the screen with the QR code and click “Next”.
- Click “Next” on “Set up your account” screen, and then QR code is shown.
- Smartphone (the same device where you installed the Microsoft Authenticator app): Click “Pair your account to the app by clicking this link”. Check that your UTokyo Account appears in the Microsoft Authenticator app. Go back to the browser and click “Next”.
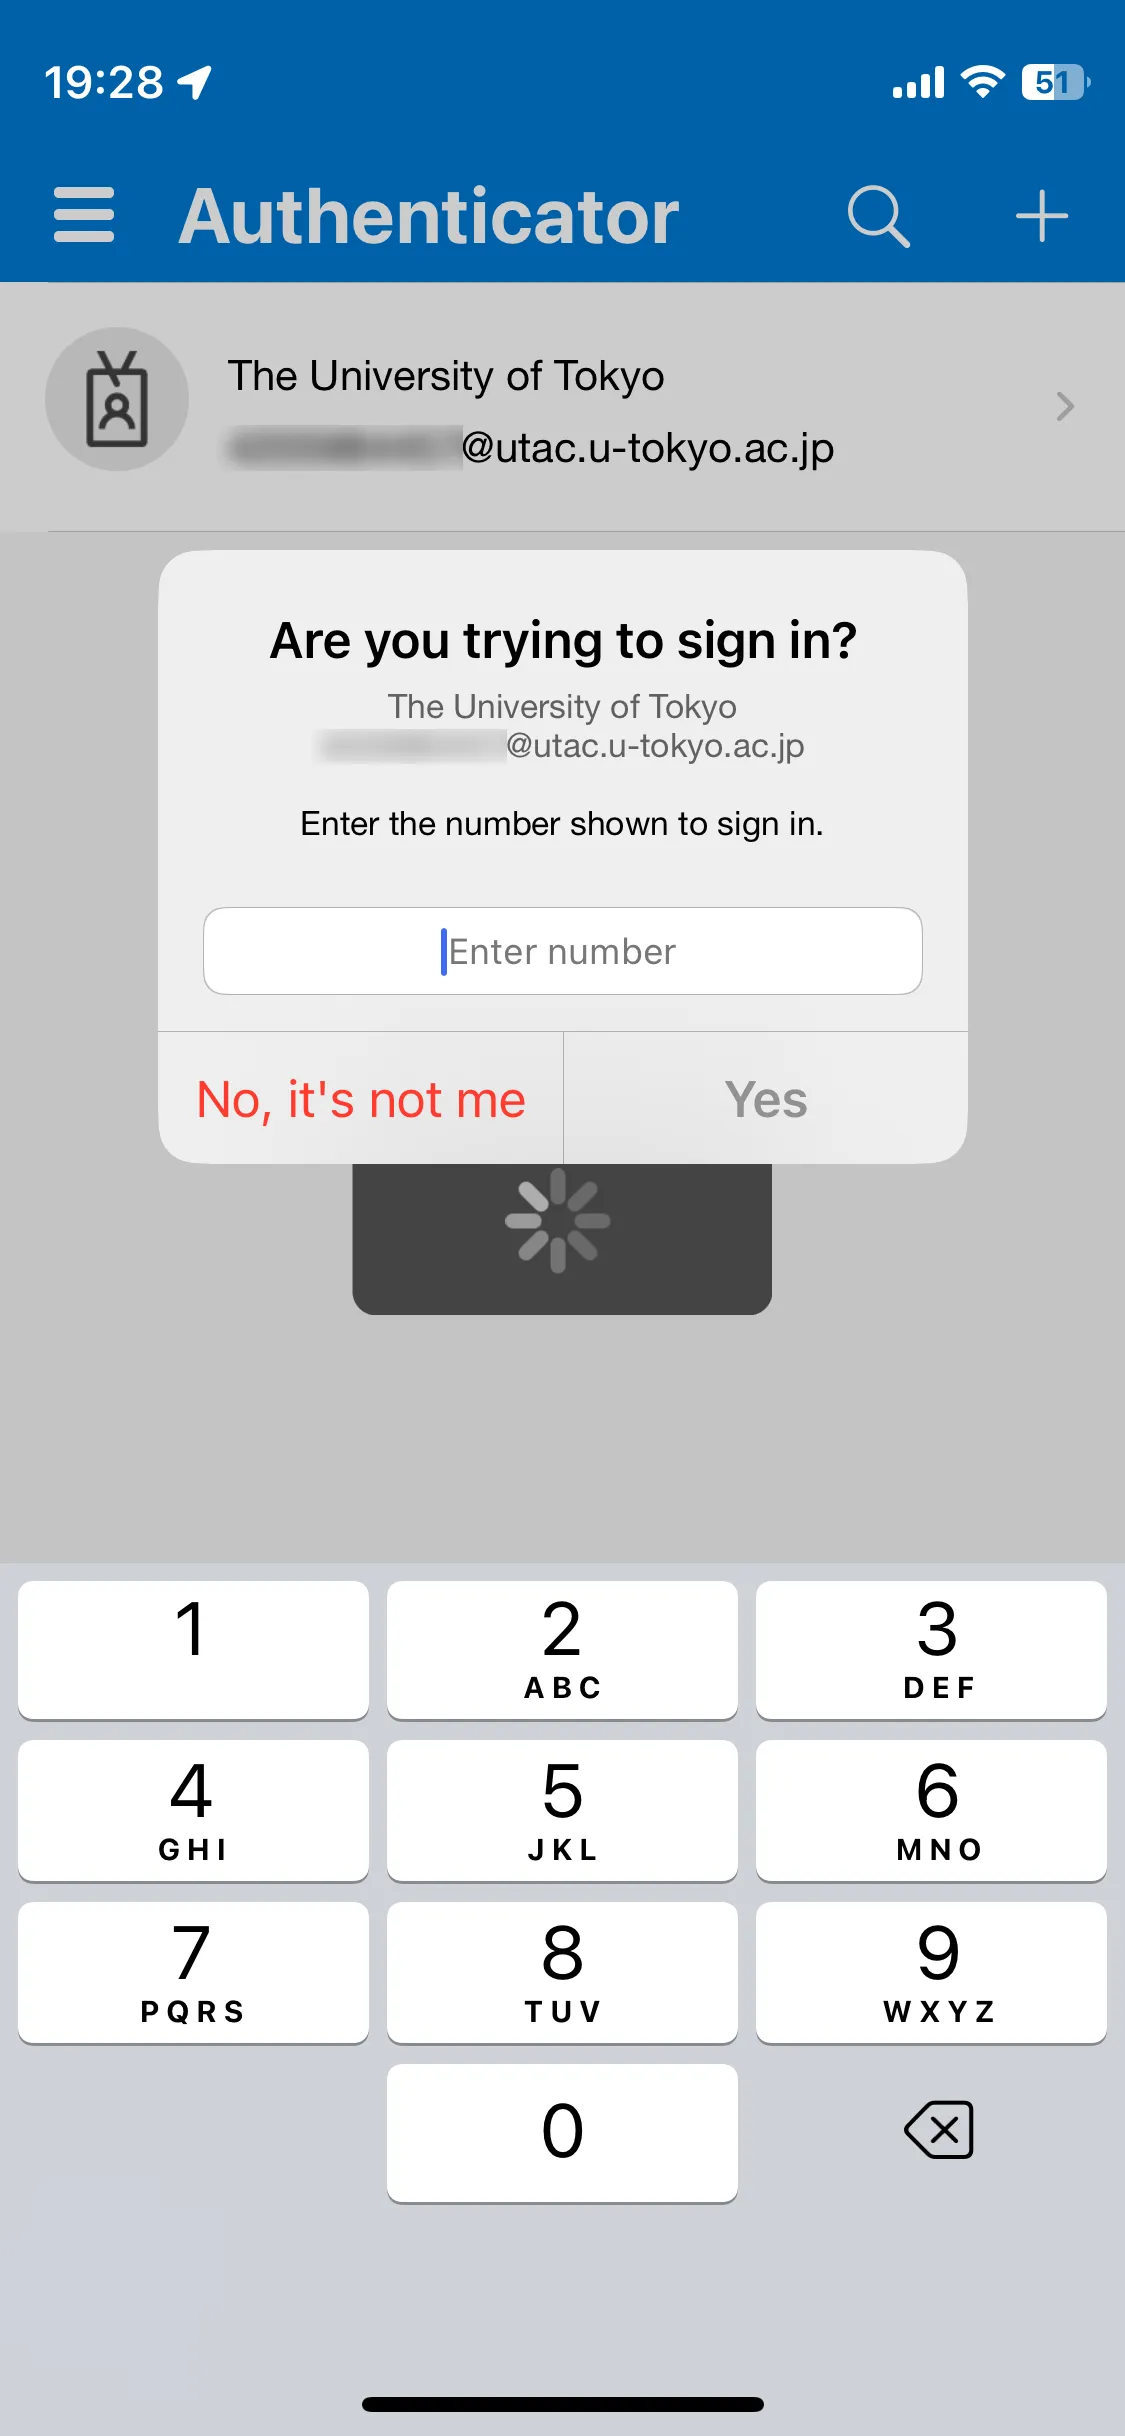
Two-digit number is shown on “Let’s try it out” screen, and at the same time a prompt opens on Microsoft Authenticator app on your smartphone. Input the number to the prompt and tap “Yes”.
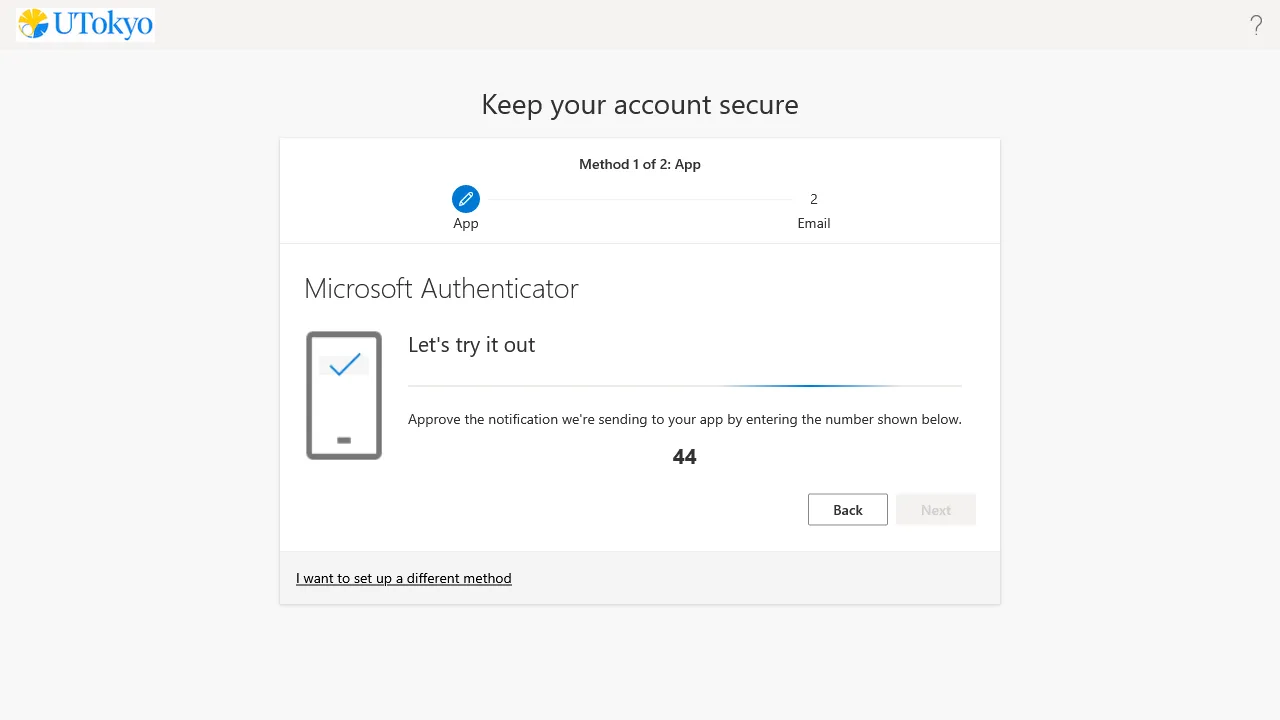
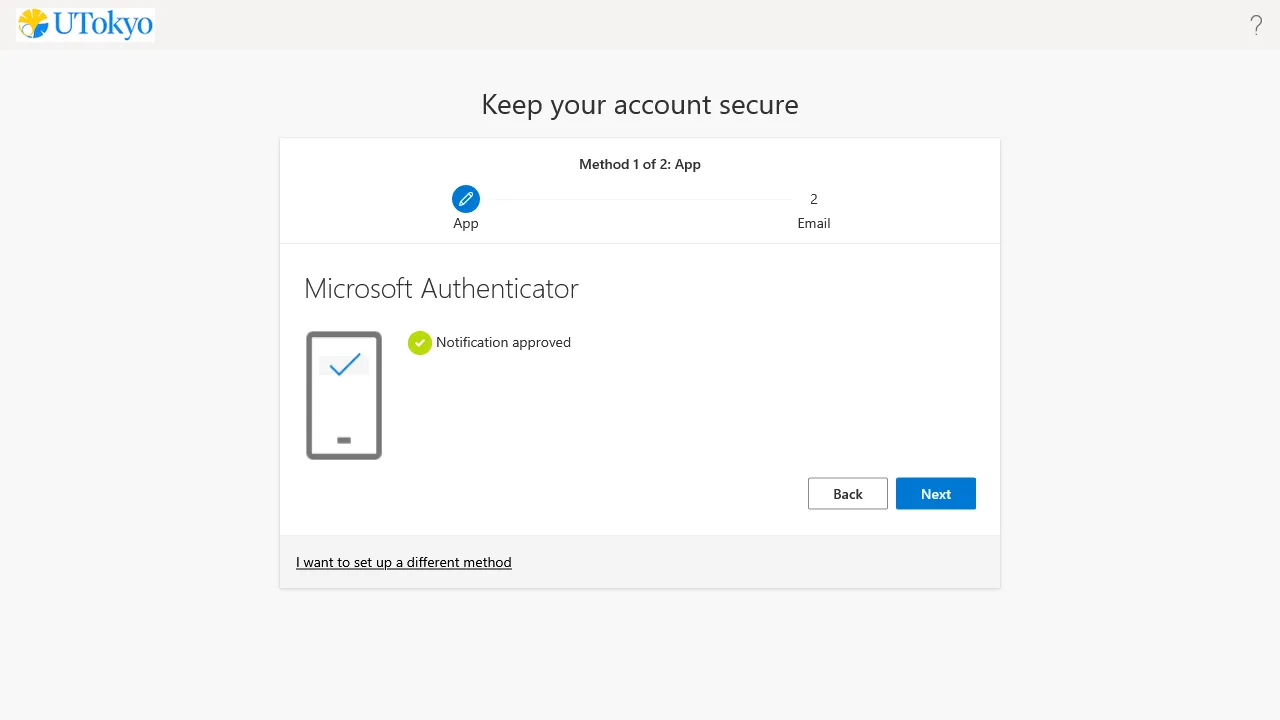
When “Notification approved” is appeared, click “Next”.
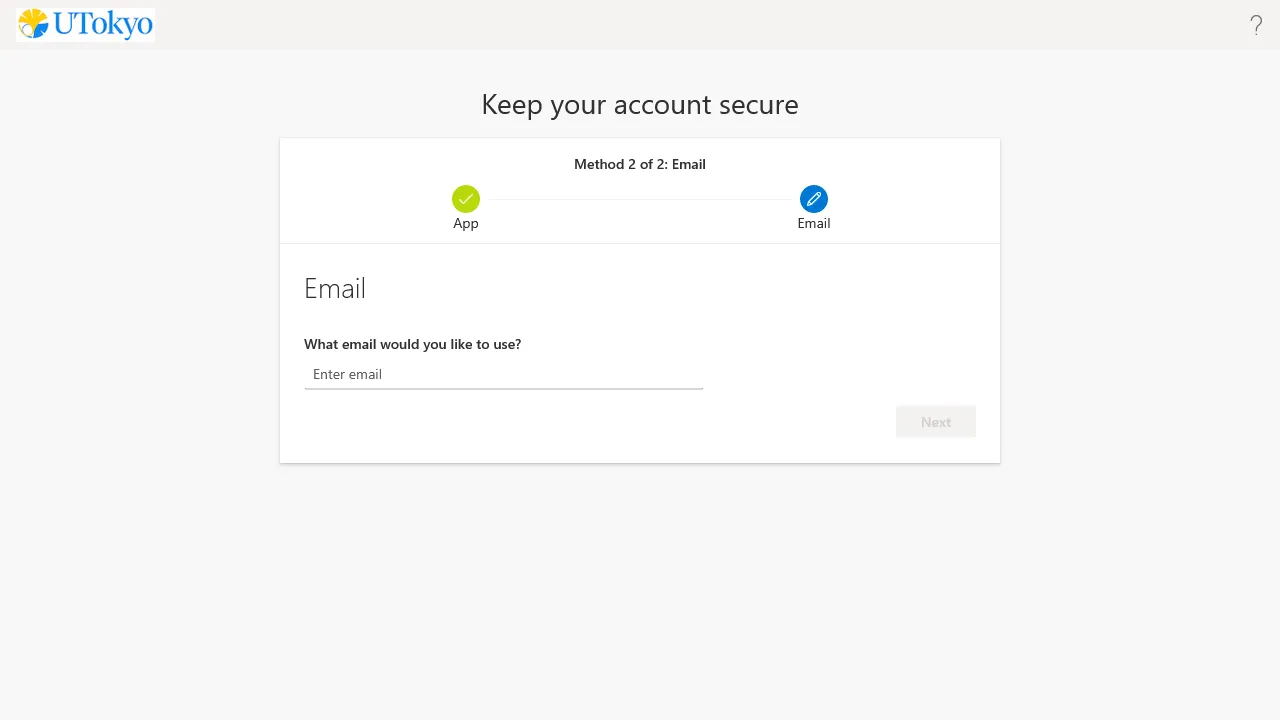
- If you haven’t already registered, you are required to enter your email address. The email provider does not matter as long as you can receive, but you should use another than ECCS Cloud Email or staff email. Then follow the instruction to input the 6-digit code sent to the address.
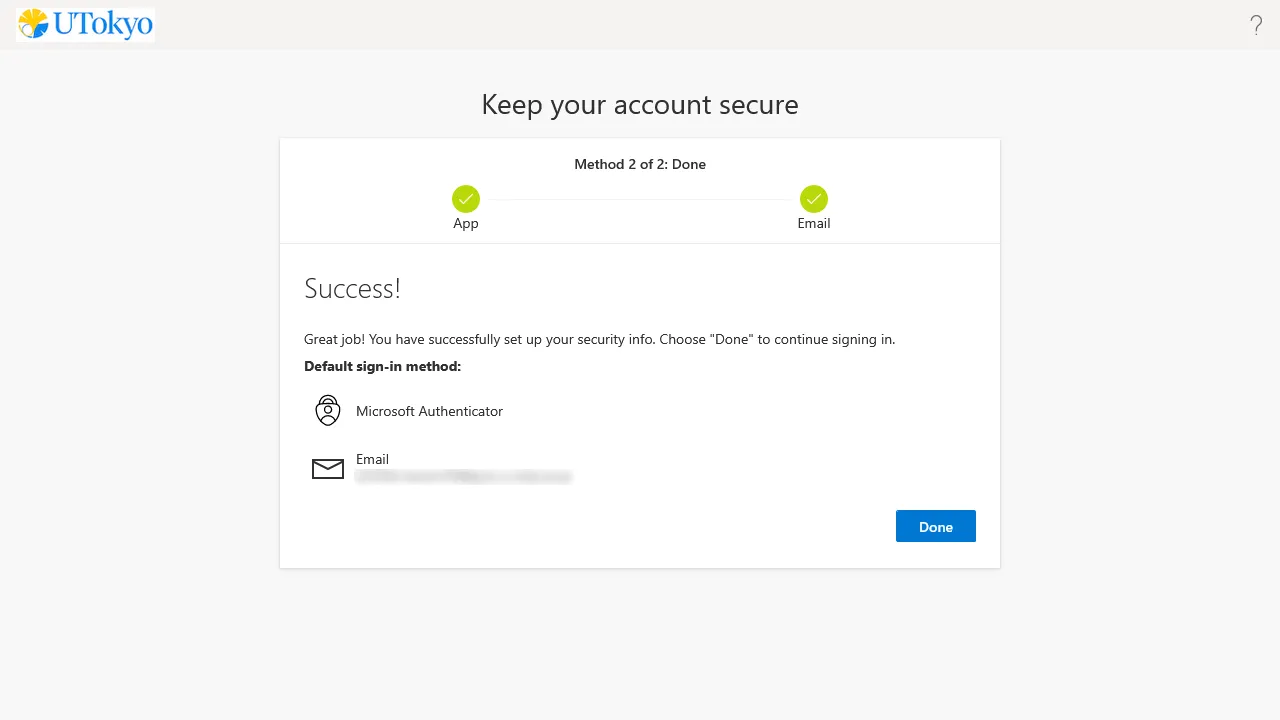
- This step has been completed when you are told “Succeeded”.
- Open security info page.
- Input 10-digit Common ID of UTokyo Account and the password on sign-in form if shown.
- Click “Next” on “More information required” screen.

Click “I want to use a different authenticator app” in the middle of the setup page.
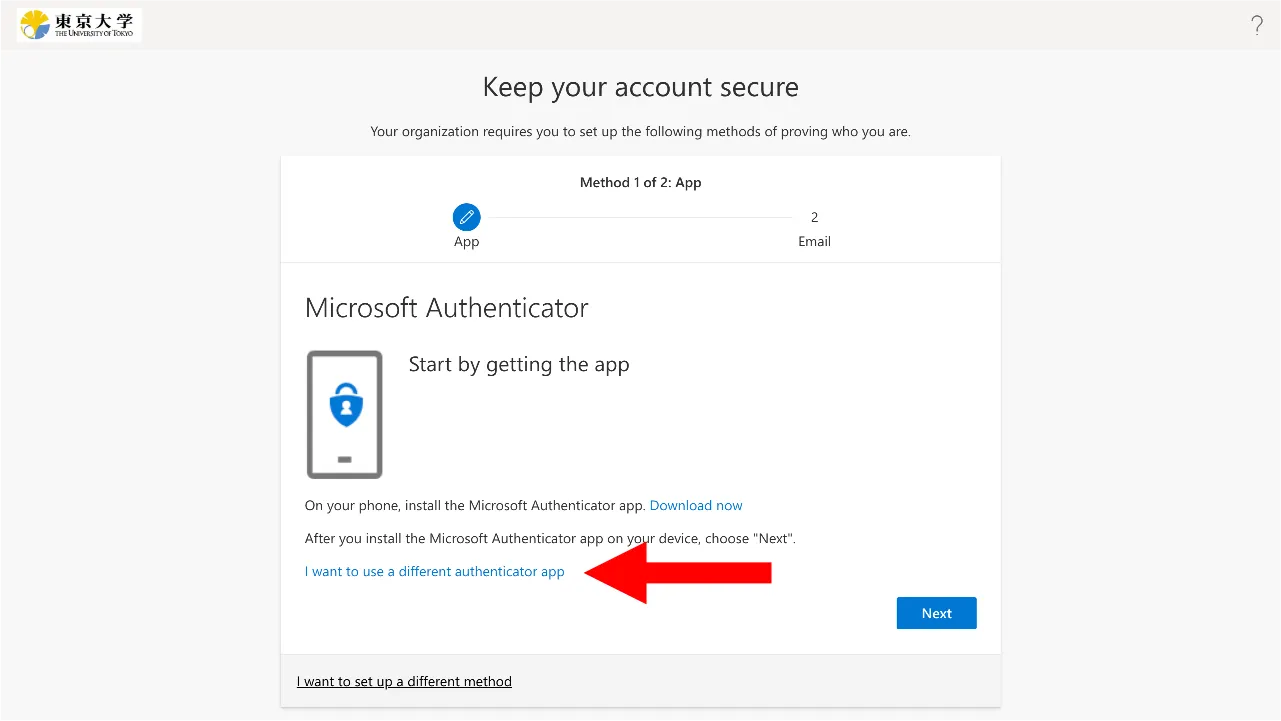
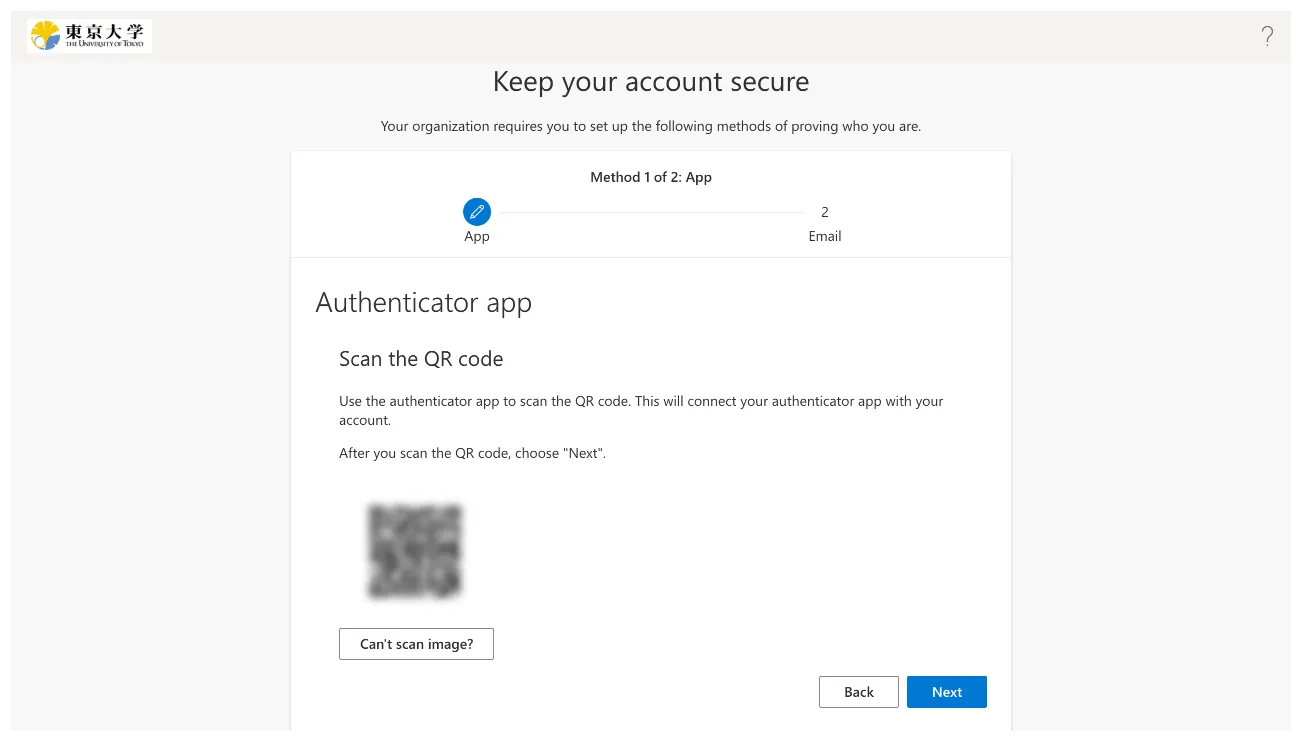
Follow the instructions until you reach the QR code page. Scan the QR code with your authenticator app and complete the setup procedure. If you want to use YubiKey and Yubico Authenticator app, see “Instructions on how to use the Yubico Authenticator for the Multi-Factor Authentication of UTokyo Accounts” page for details.
- If you haven’t already registered, you are required to enter your email address. The email provider does not matter as long as you can receive, but you should use another than ECCS Cloud Email or staff email. Then follow the instruction to input the 6-digit code sent to the address.

- This step has been completed when you are told “Succeeded”.

- Open security info page.
- Input 10-digit Common ID of UTokyo Account and the password on sign-in form if shown.
- Click “Next” on “More information required” screen.

Click “I want to use a different method” at the bottom of the setup page.
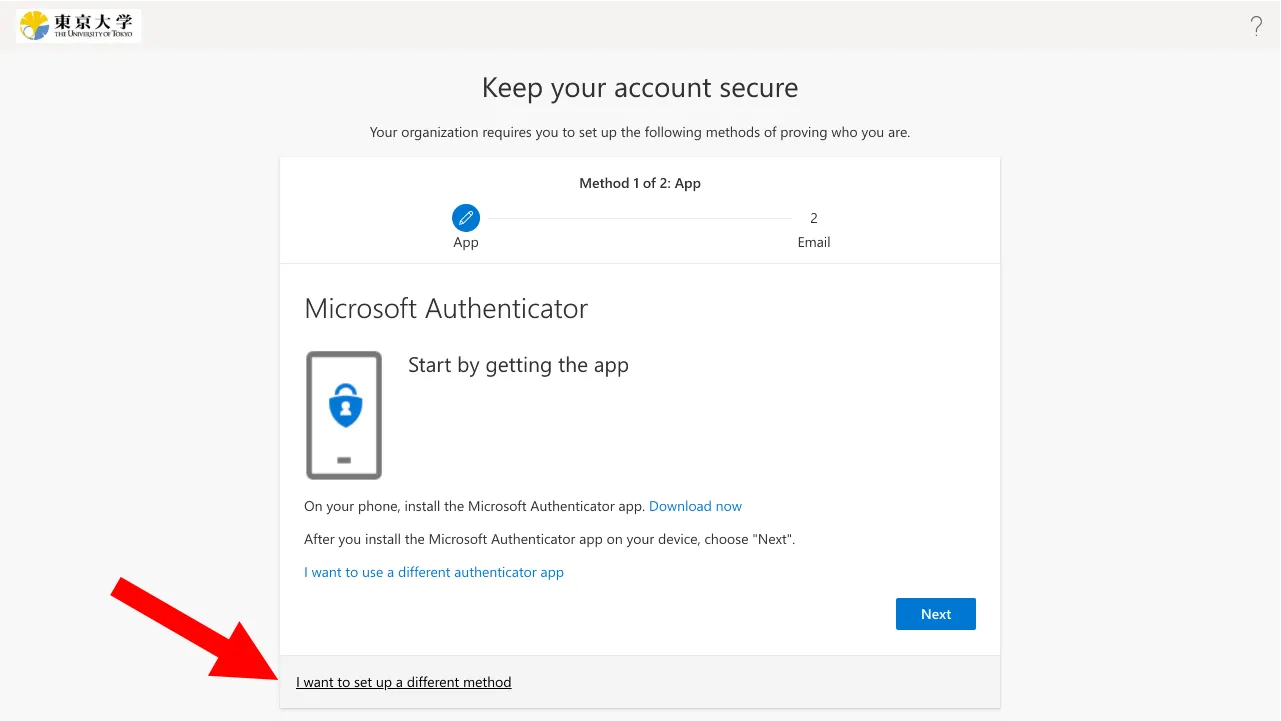
For “Which method would you like to use?”, select "Phone", and then click “Add”.
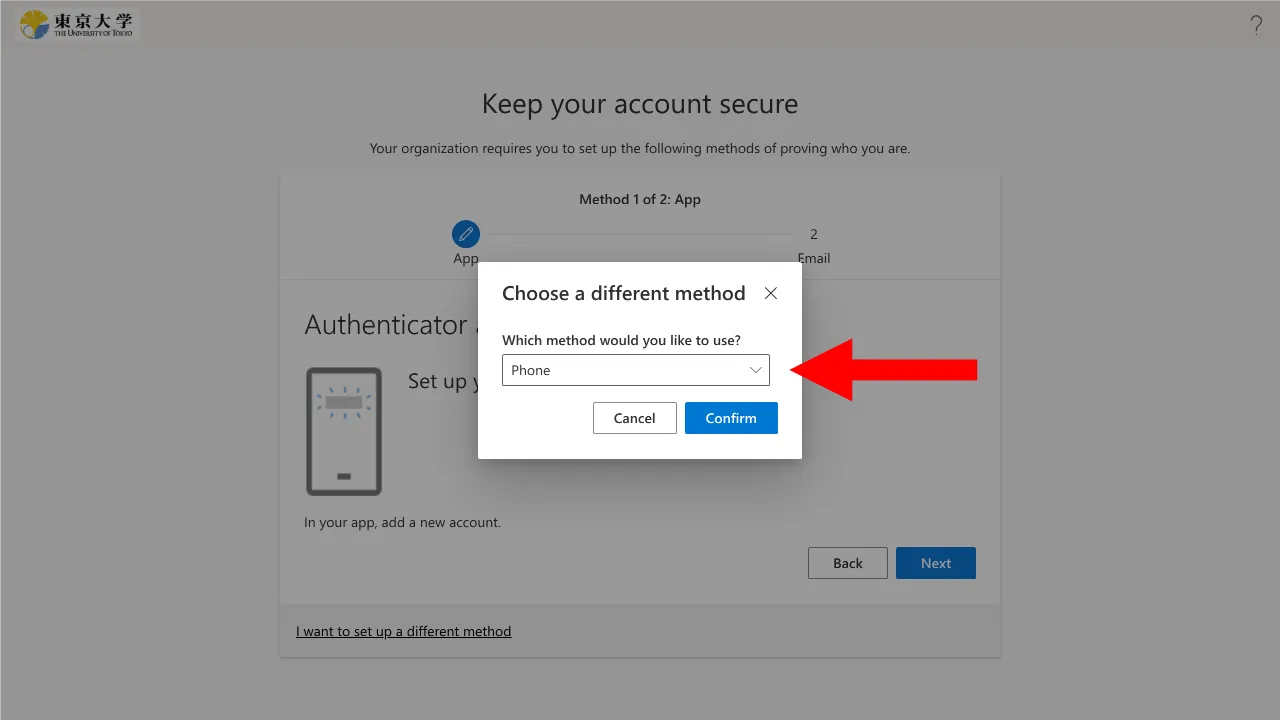
For “What phone number would you like to use?”, select the appropriate country code (+81 for Japan) and input your phone number. Also, choose to either receive a text message with a verification code (“Text me a code”) or a phone call (“Call me”).
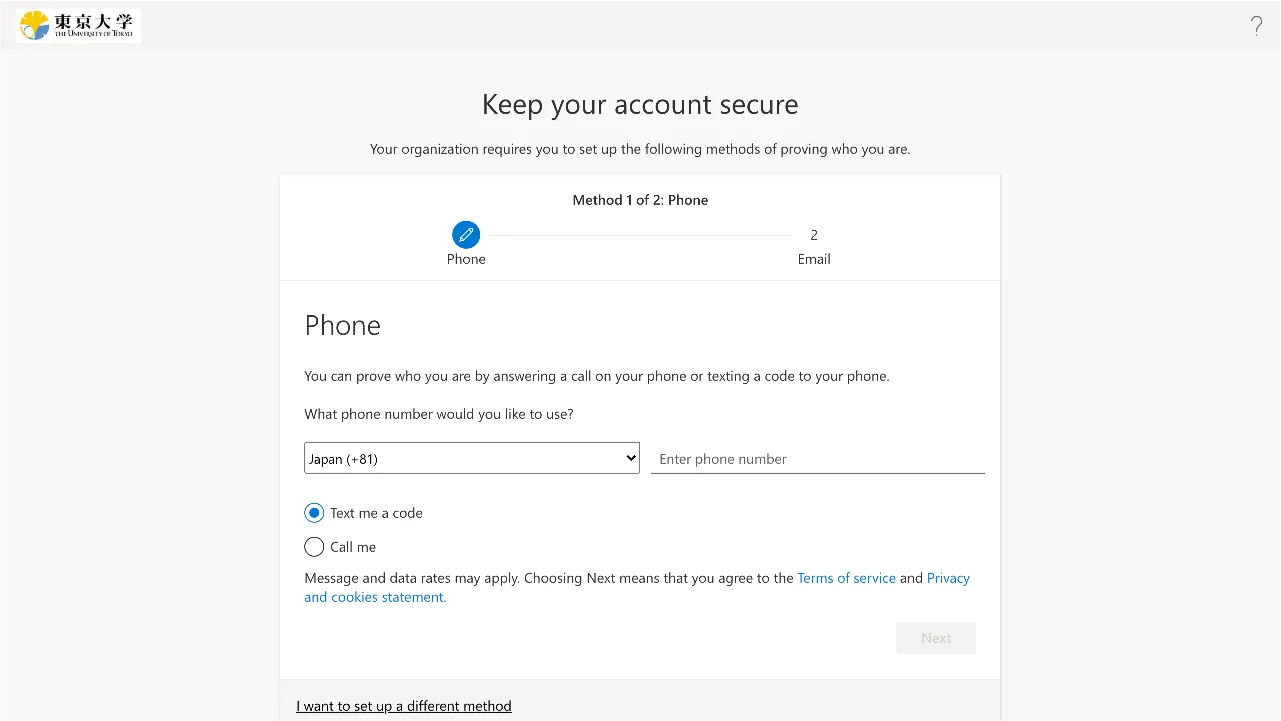
- Click “Next”.
You will receive a text or call on your phone to verify your identity. If you selected “Text me a code”, you will receive an SMS message with a 6-digit verification code. Input the code in the setup page. If you selected “Call me”, you will receive a phone call asking you press the pound key (#) on your phone to verify your identity. Press the key and end the call. (To display the pound key on your smartphone during the call, press the “keypad” button.)
- If you haven’t already registered, you are required to enter your email address. The email provider does not matter as long as you can receive, but you should use another than ECCS Cloud Email or staff email. Then follow the instruction to input the 6-digit code sent to the address.

- This step has been completed when you are told “Succeeded”.

Step 2: Add Alternative Verification Methods
Next, add alternative verification methods (second and subsequent methods) from the Security info page.
Be sure to add more than one verification method. MFA does work with just one verification method, but having only one verification method puts you at risk of getting completely locked out of your UTokyo Account when your verification method does not work (due to malfunction, model change, etc.). Adding multiple verification methods reduces this risk.
The procedure of step 2 differs depending on the verification method you selected. Click the following panels to show the procedure to set up the verification method.
Select an verification method you will register.
Install the “Microsoft Authenticator” app on your smartphone if you haven’t already done. The Android version is available in Google Play, and the iPhone version is available in App Store.
Open Security info page.
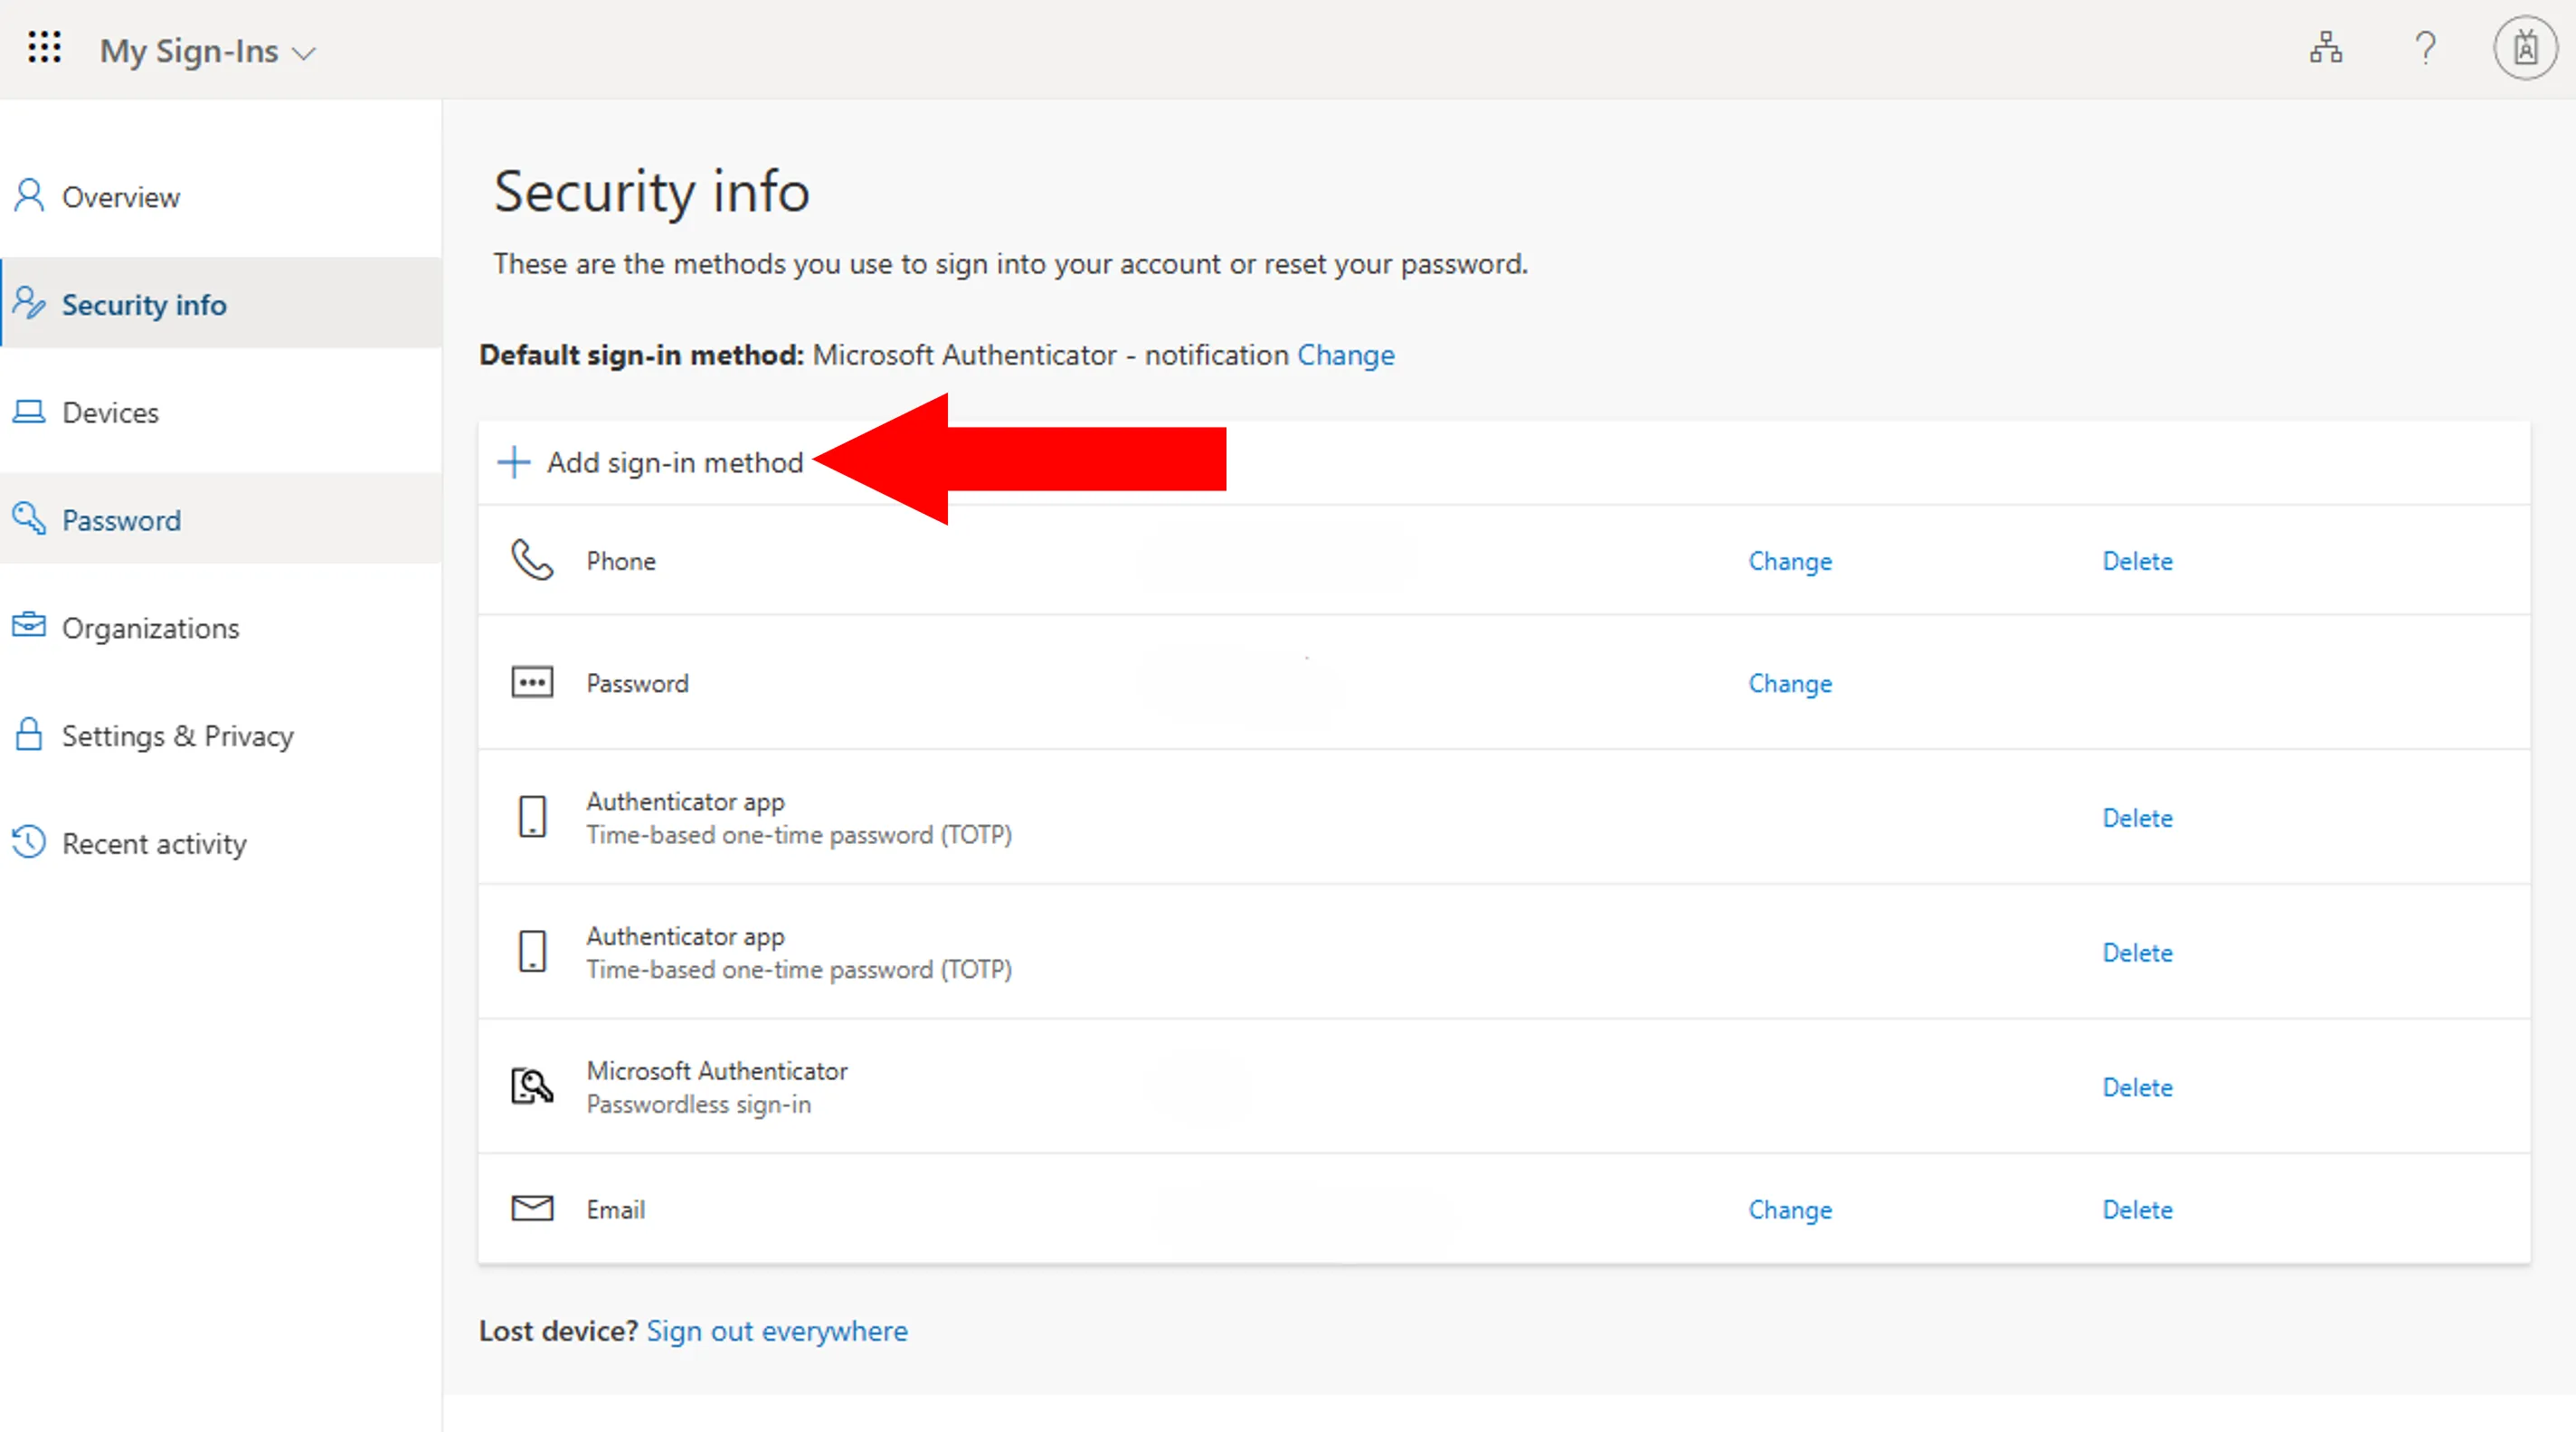
Click “Add sign-in method”.
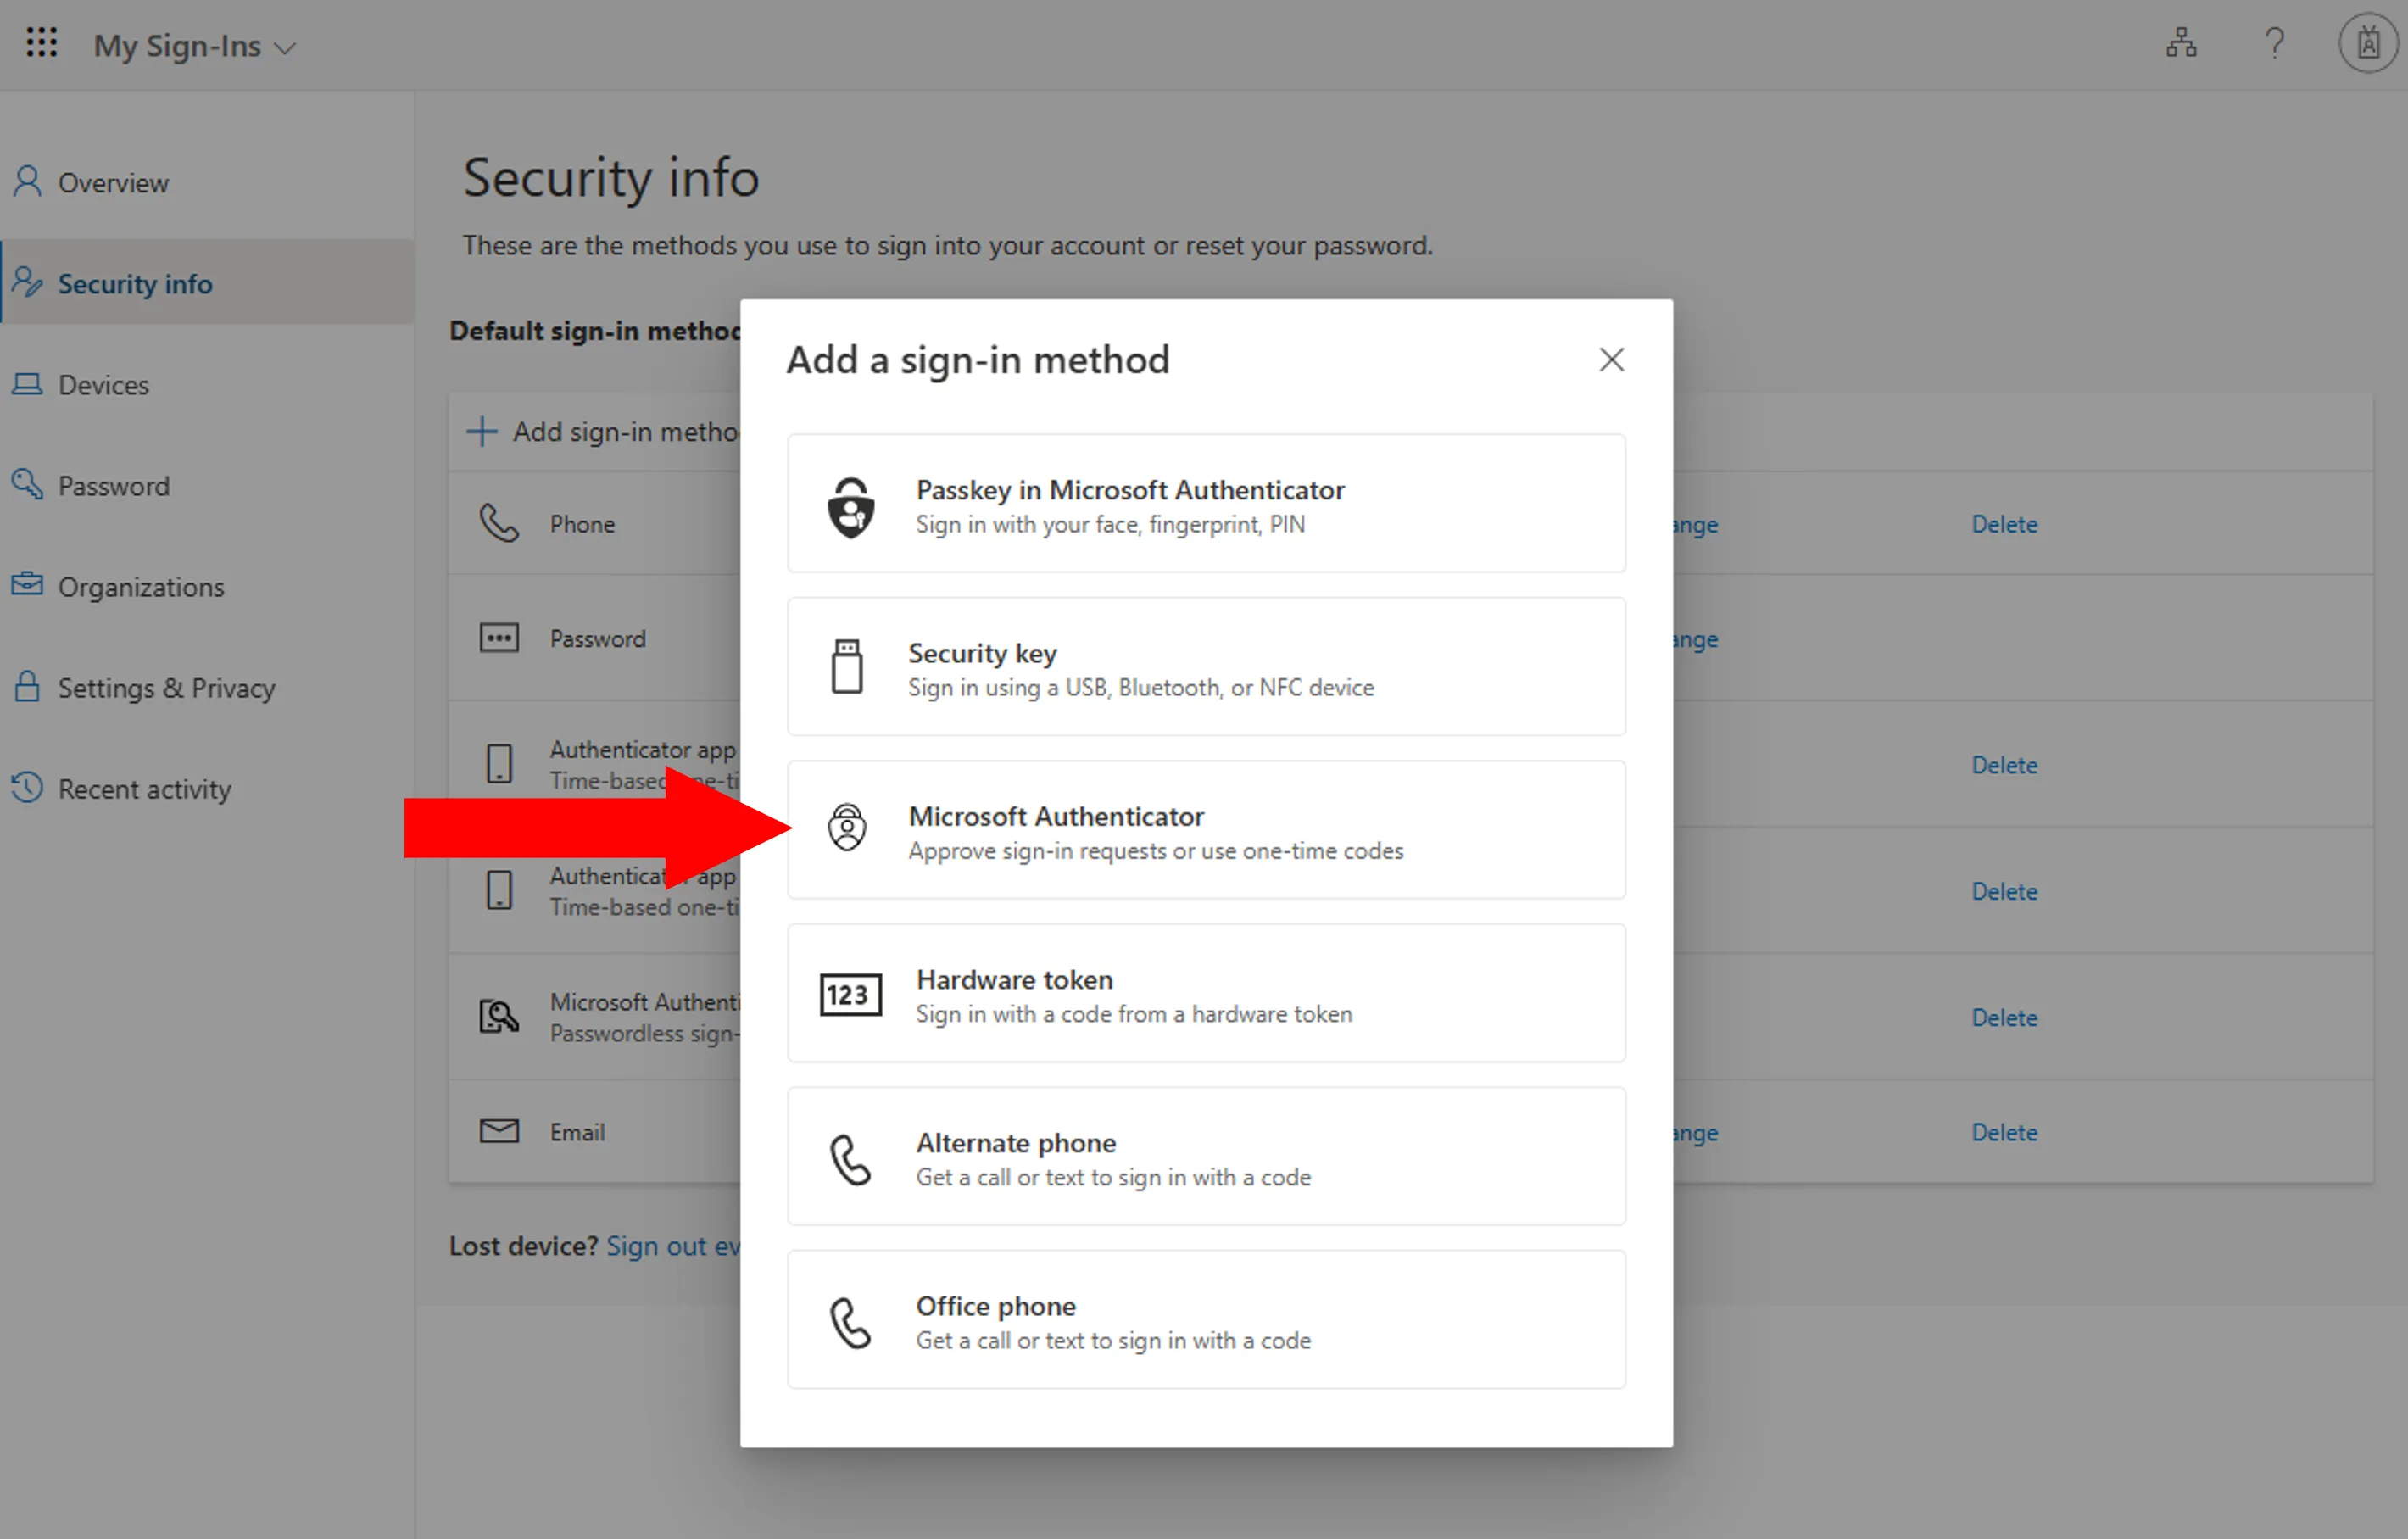
For “Add a sign-in method”, select "Microsoft Authenticator".
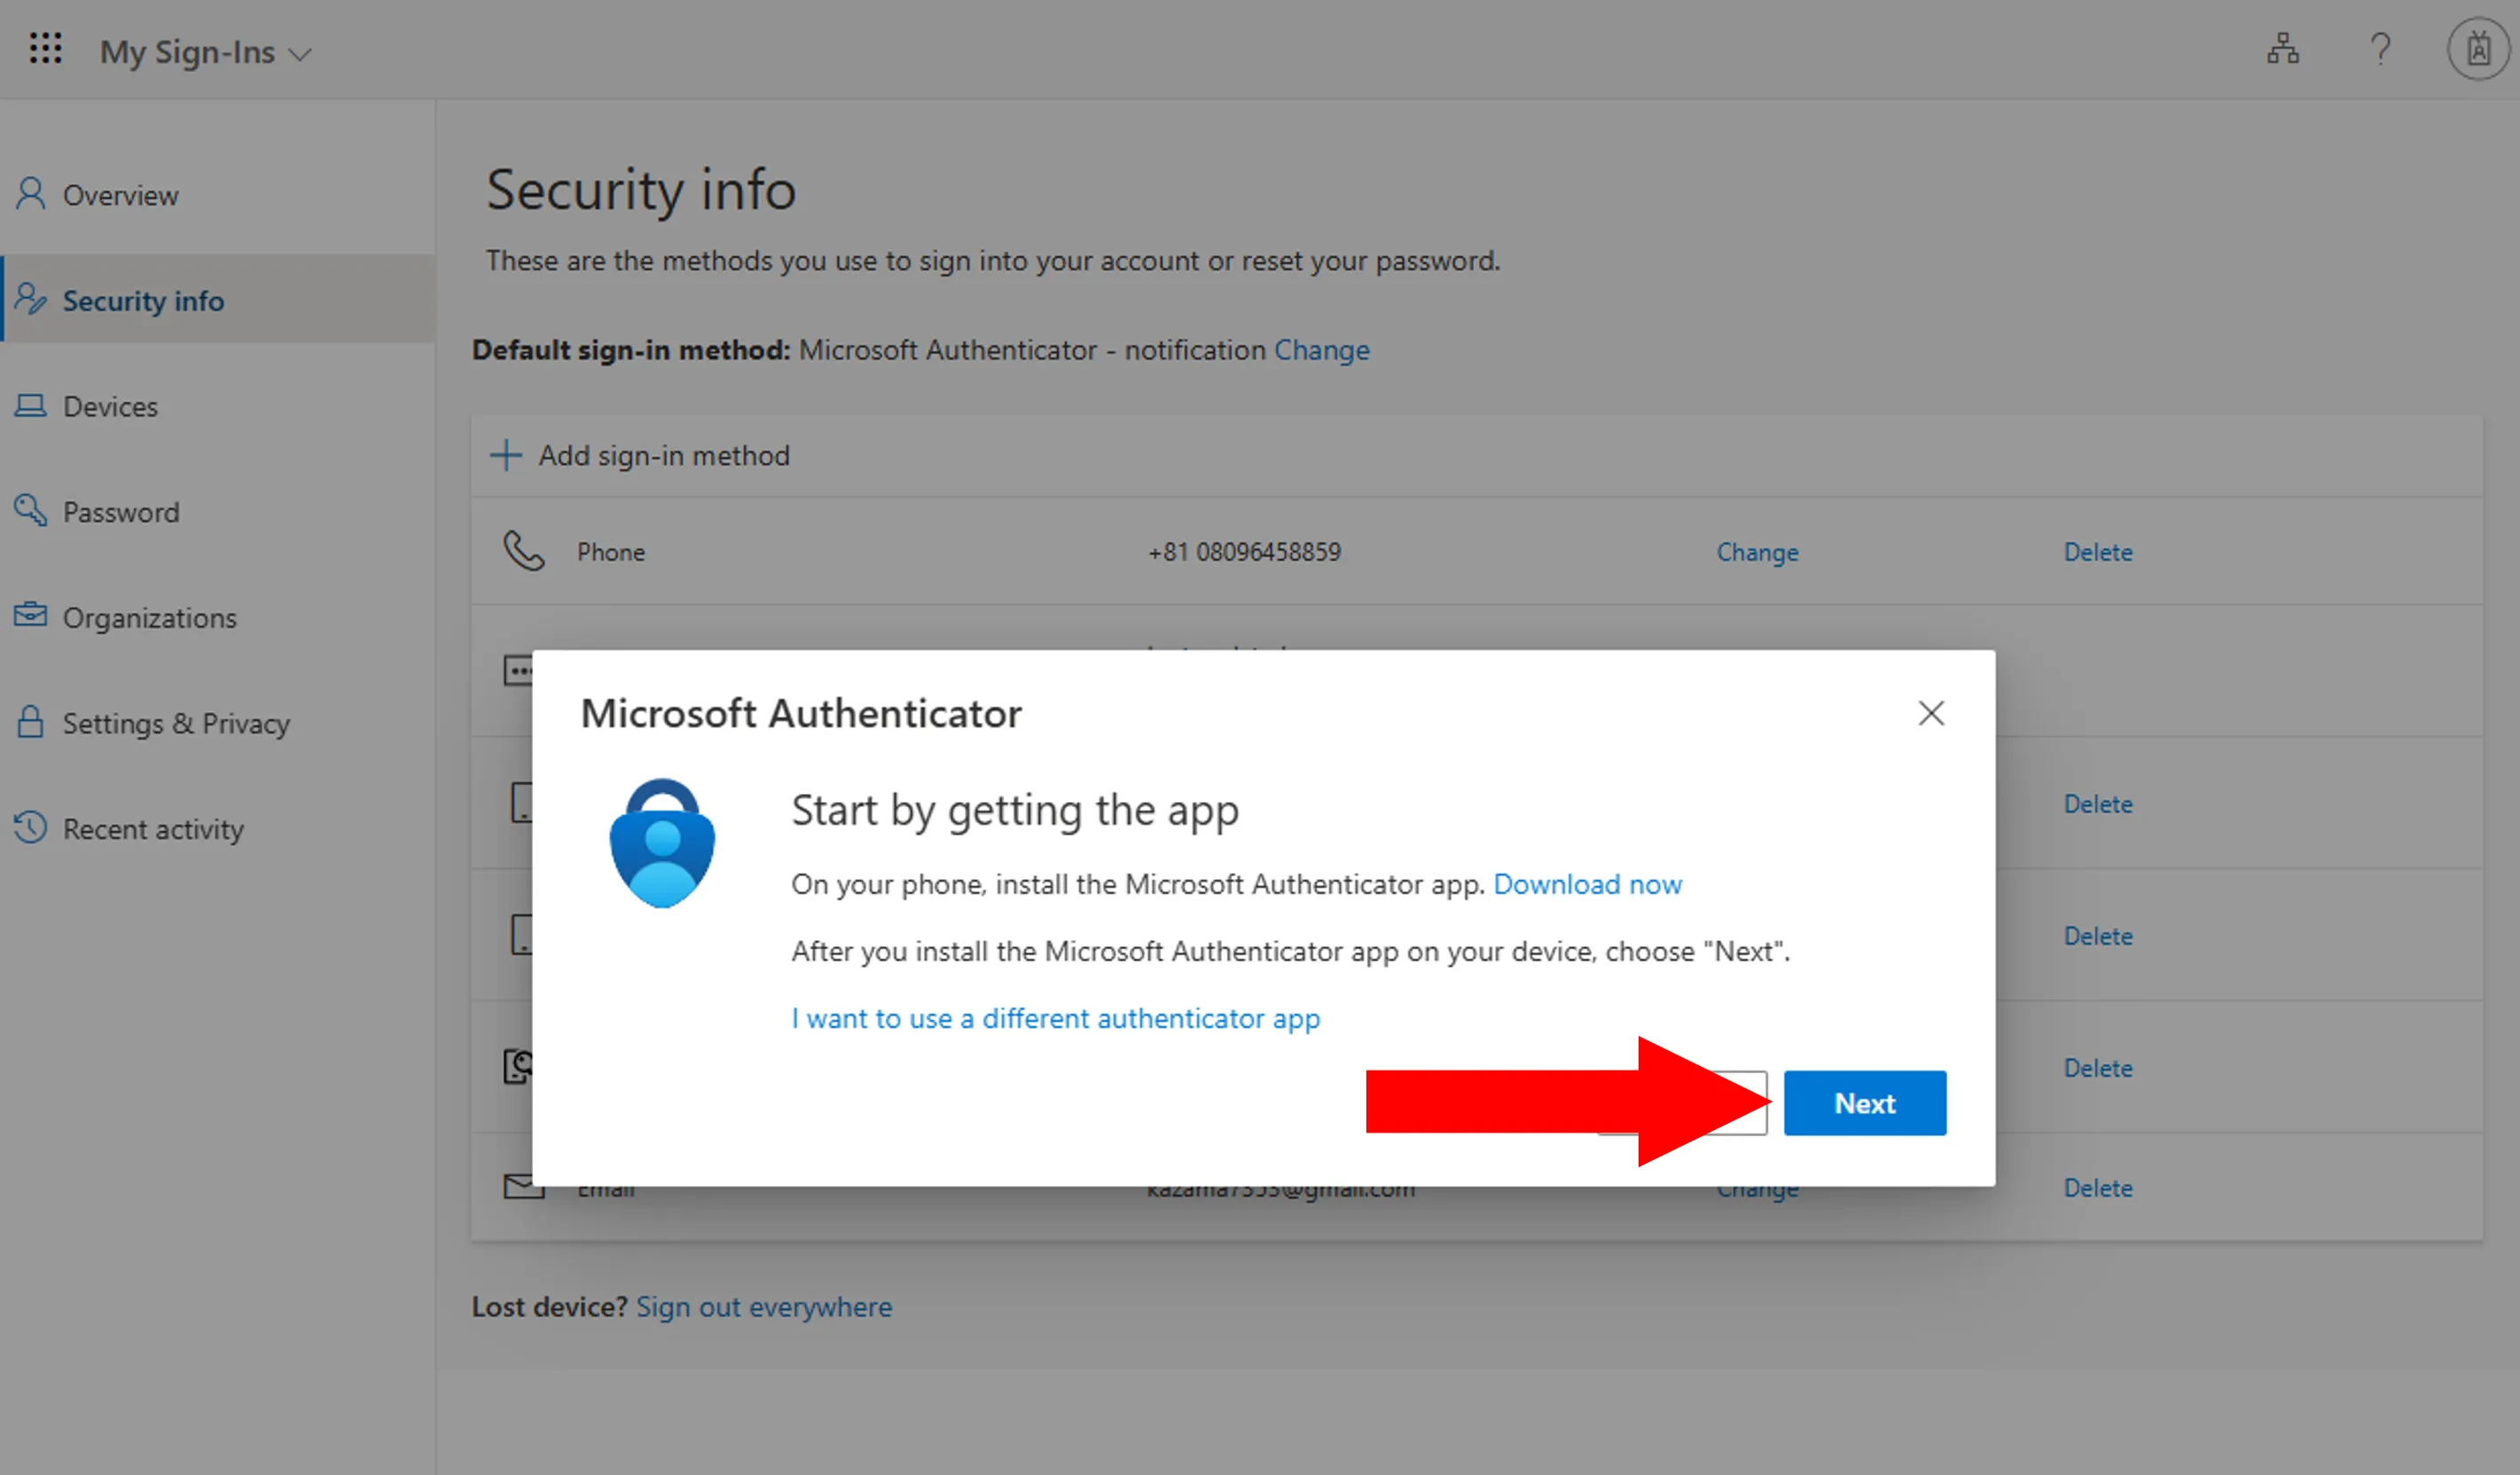
Click “Next” on the “Start by getting the app” screen.
The next procedure differs depending on the device that you are using: your smartphone (Microsoft Authenticator app has been installed) or else (PC etc.)
- Smartphone (the same device where you installed the Microsoft Authenticator app): Click “Pair your account to the app by clicking this link”. Check that your UTokyo Account appears in the Microsoft Authenticator app. Go back to the browser and click “Next”.
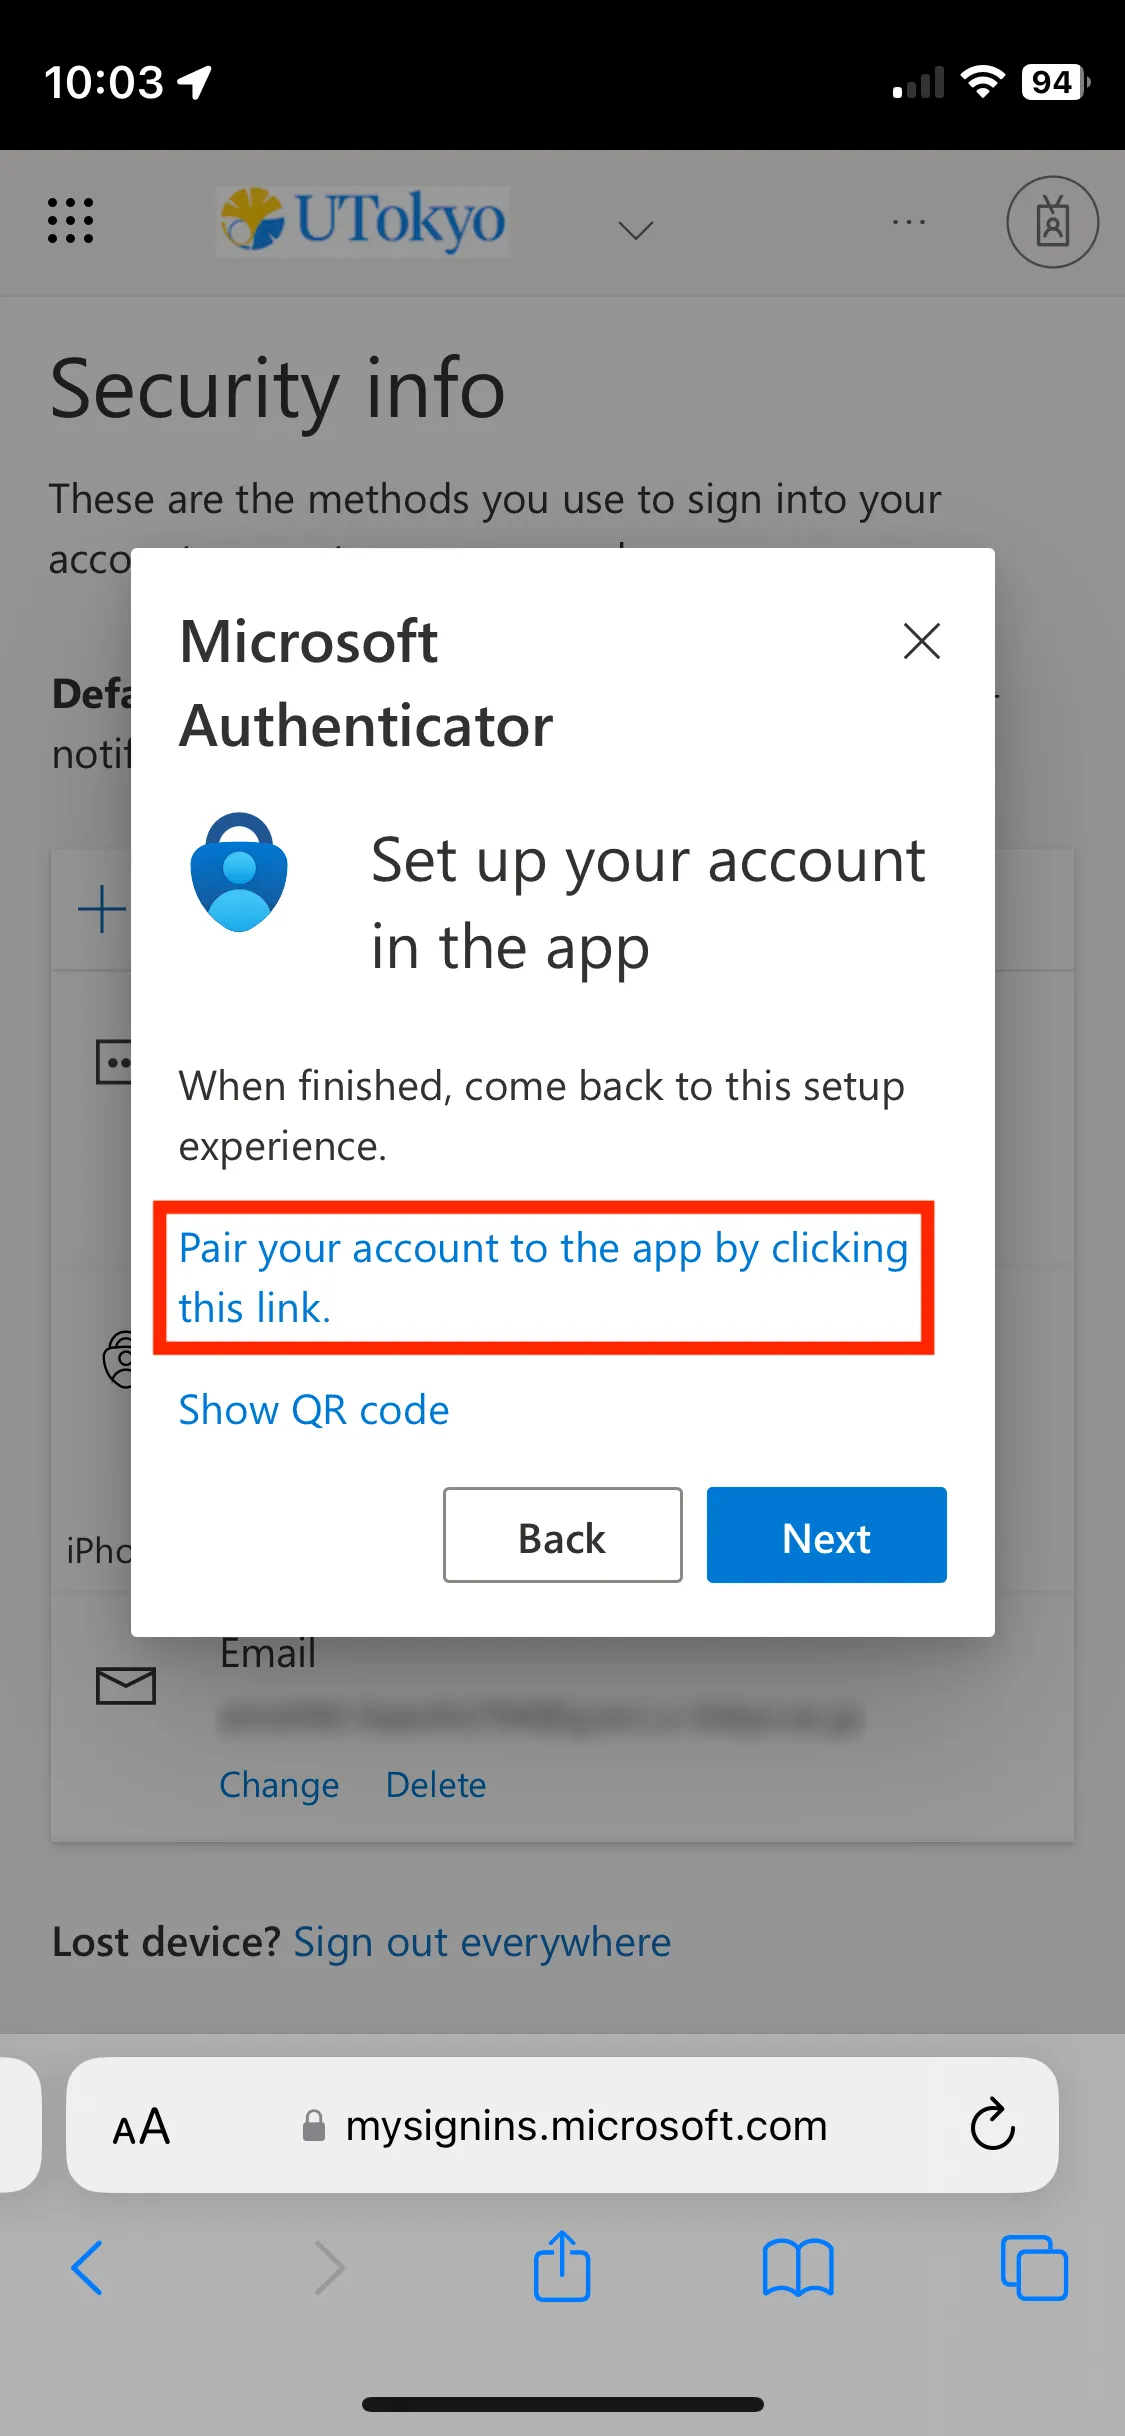
- Other Devices (PC etc.)
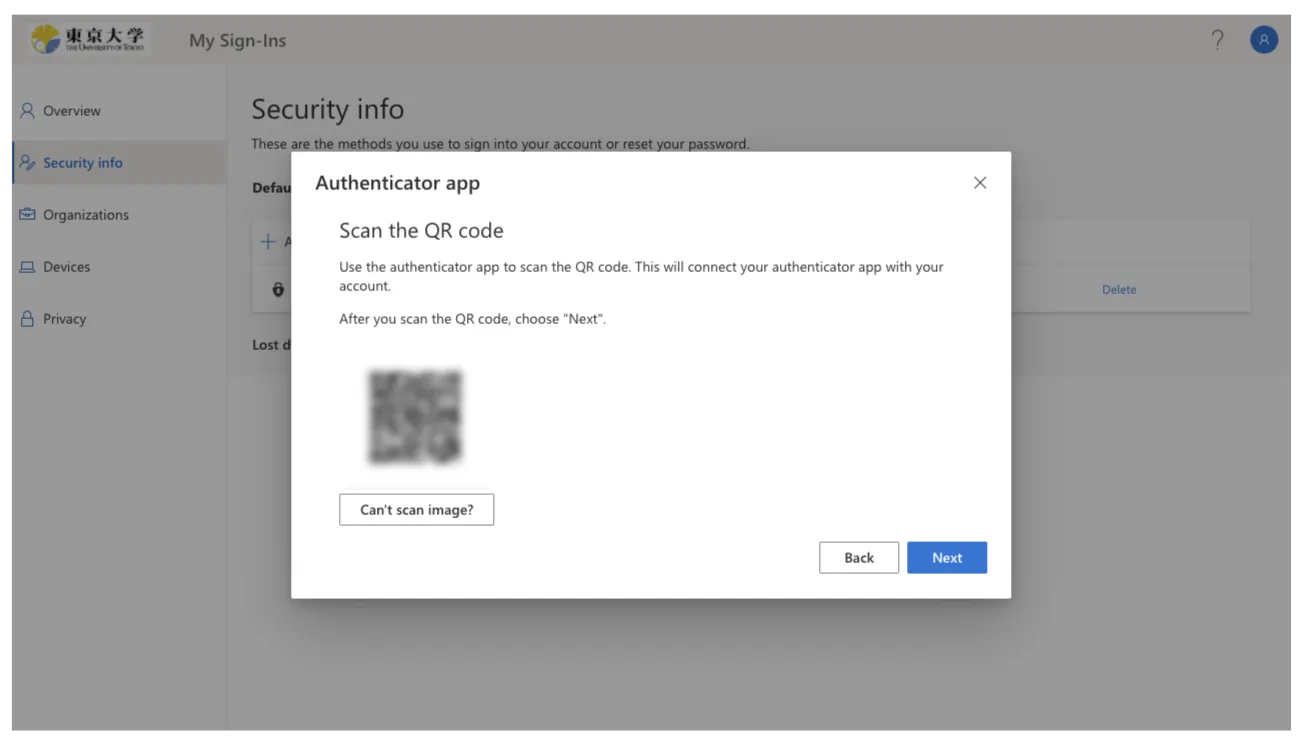
- Click “Next” on “Set up your account” screen, and then QR code is shown.

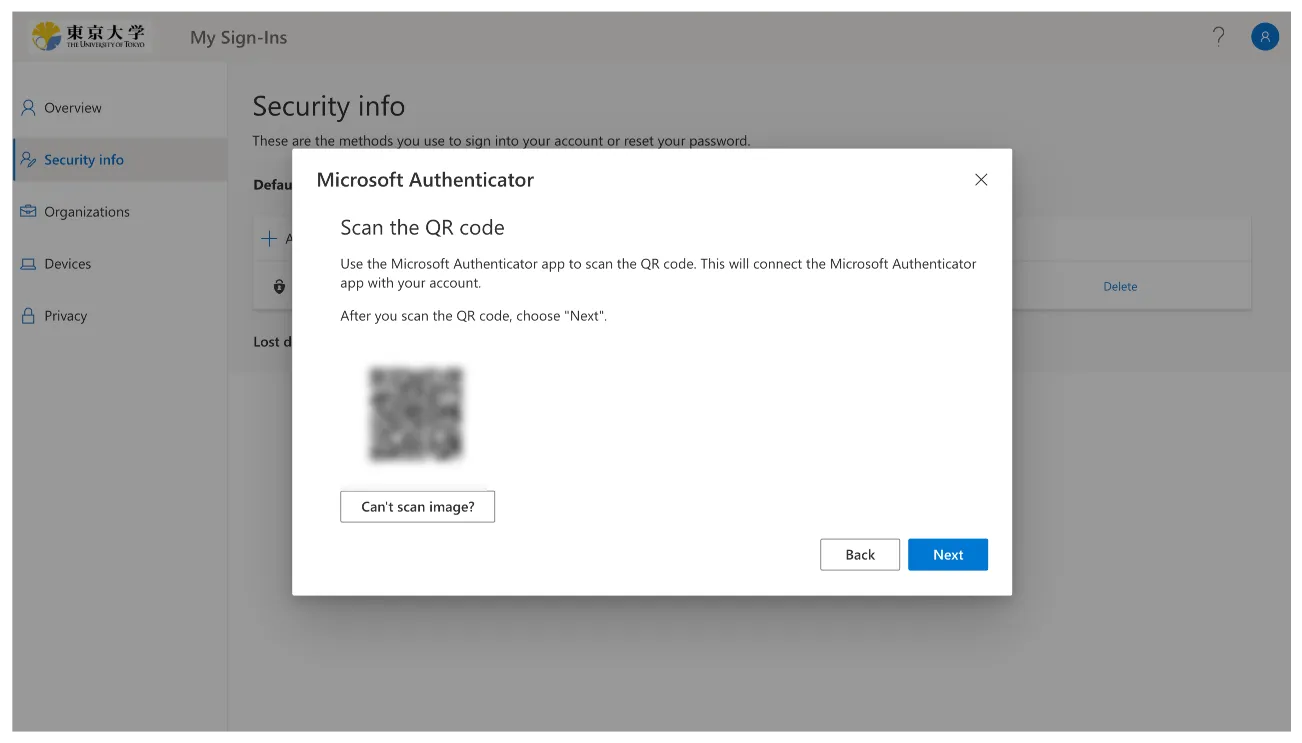
- Open the Microsoft Authenticator app on your smartphone. If you open the app for the first time after installation, you will be asked to accept privacy policy and to select whether to share your app usage data, so follow the instructions.


- If “Secure your digital life” screen like the first image below is shown, tap “Scan a QR code”. Instead, screens like the second or third images is shown, tap the ”+” icon in the upper right, and select “Work or school account” and “Scan a QR code” in turn. In all cases, you may be asked to allow the app to access the camera, so then do.


- Scan the QR code with your device’s camera. If you are asked to allow the app to notify, then do.
- After succeeding scan, check that your UTokyo Account appears on the app. Go back to the screen with the QR code and click “Next”.

- Click “Next” on “Set up your account” screen, and then QR code is shown.
- Smartphone (the same device where you installed the Microsoft Authenticator app): Click “Pair your account to the app by clicking this link”. Check that your UTokyo Account appears in the Microsoft Authenticator app. Go back to the browser and click “Next”.
Two-digit number is shown on “Let’s try it out” screen, and at the same time a prompt opens on Microsoft Authenticator app on your smartphone. Input the number to the prompt and tap “Yes”.
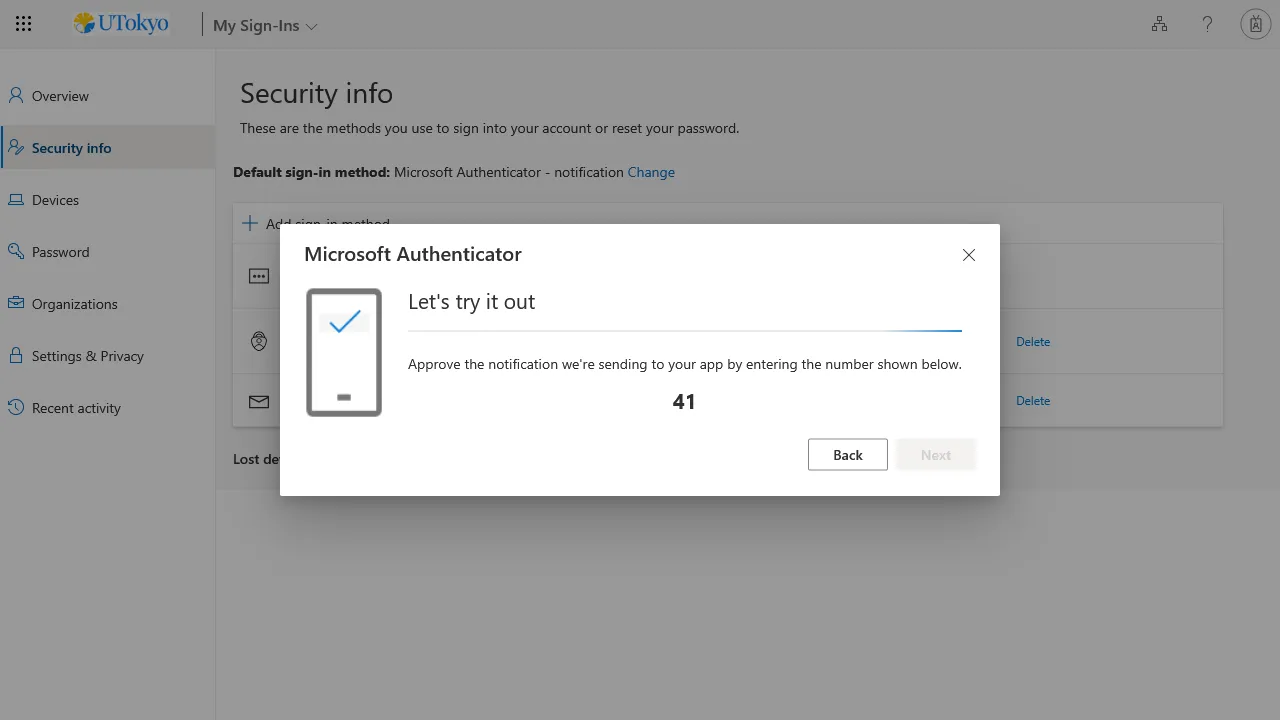

When “Notification approved” is appeared, click “Next”.

Open Security info page.
Click “Add sign-in method”.

For “Add a sign-in method”, select "Microsoft Authenticator".

Click “I want to use a different authenticator app”.
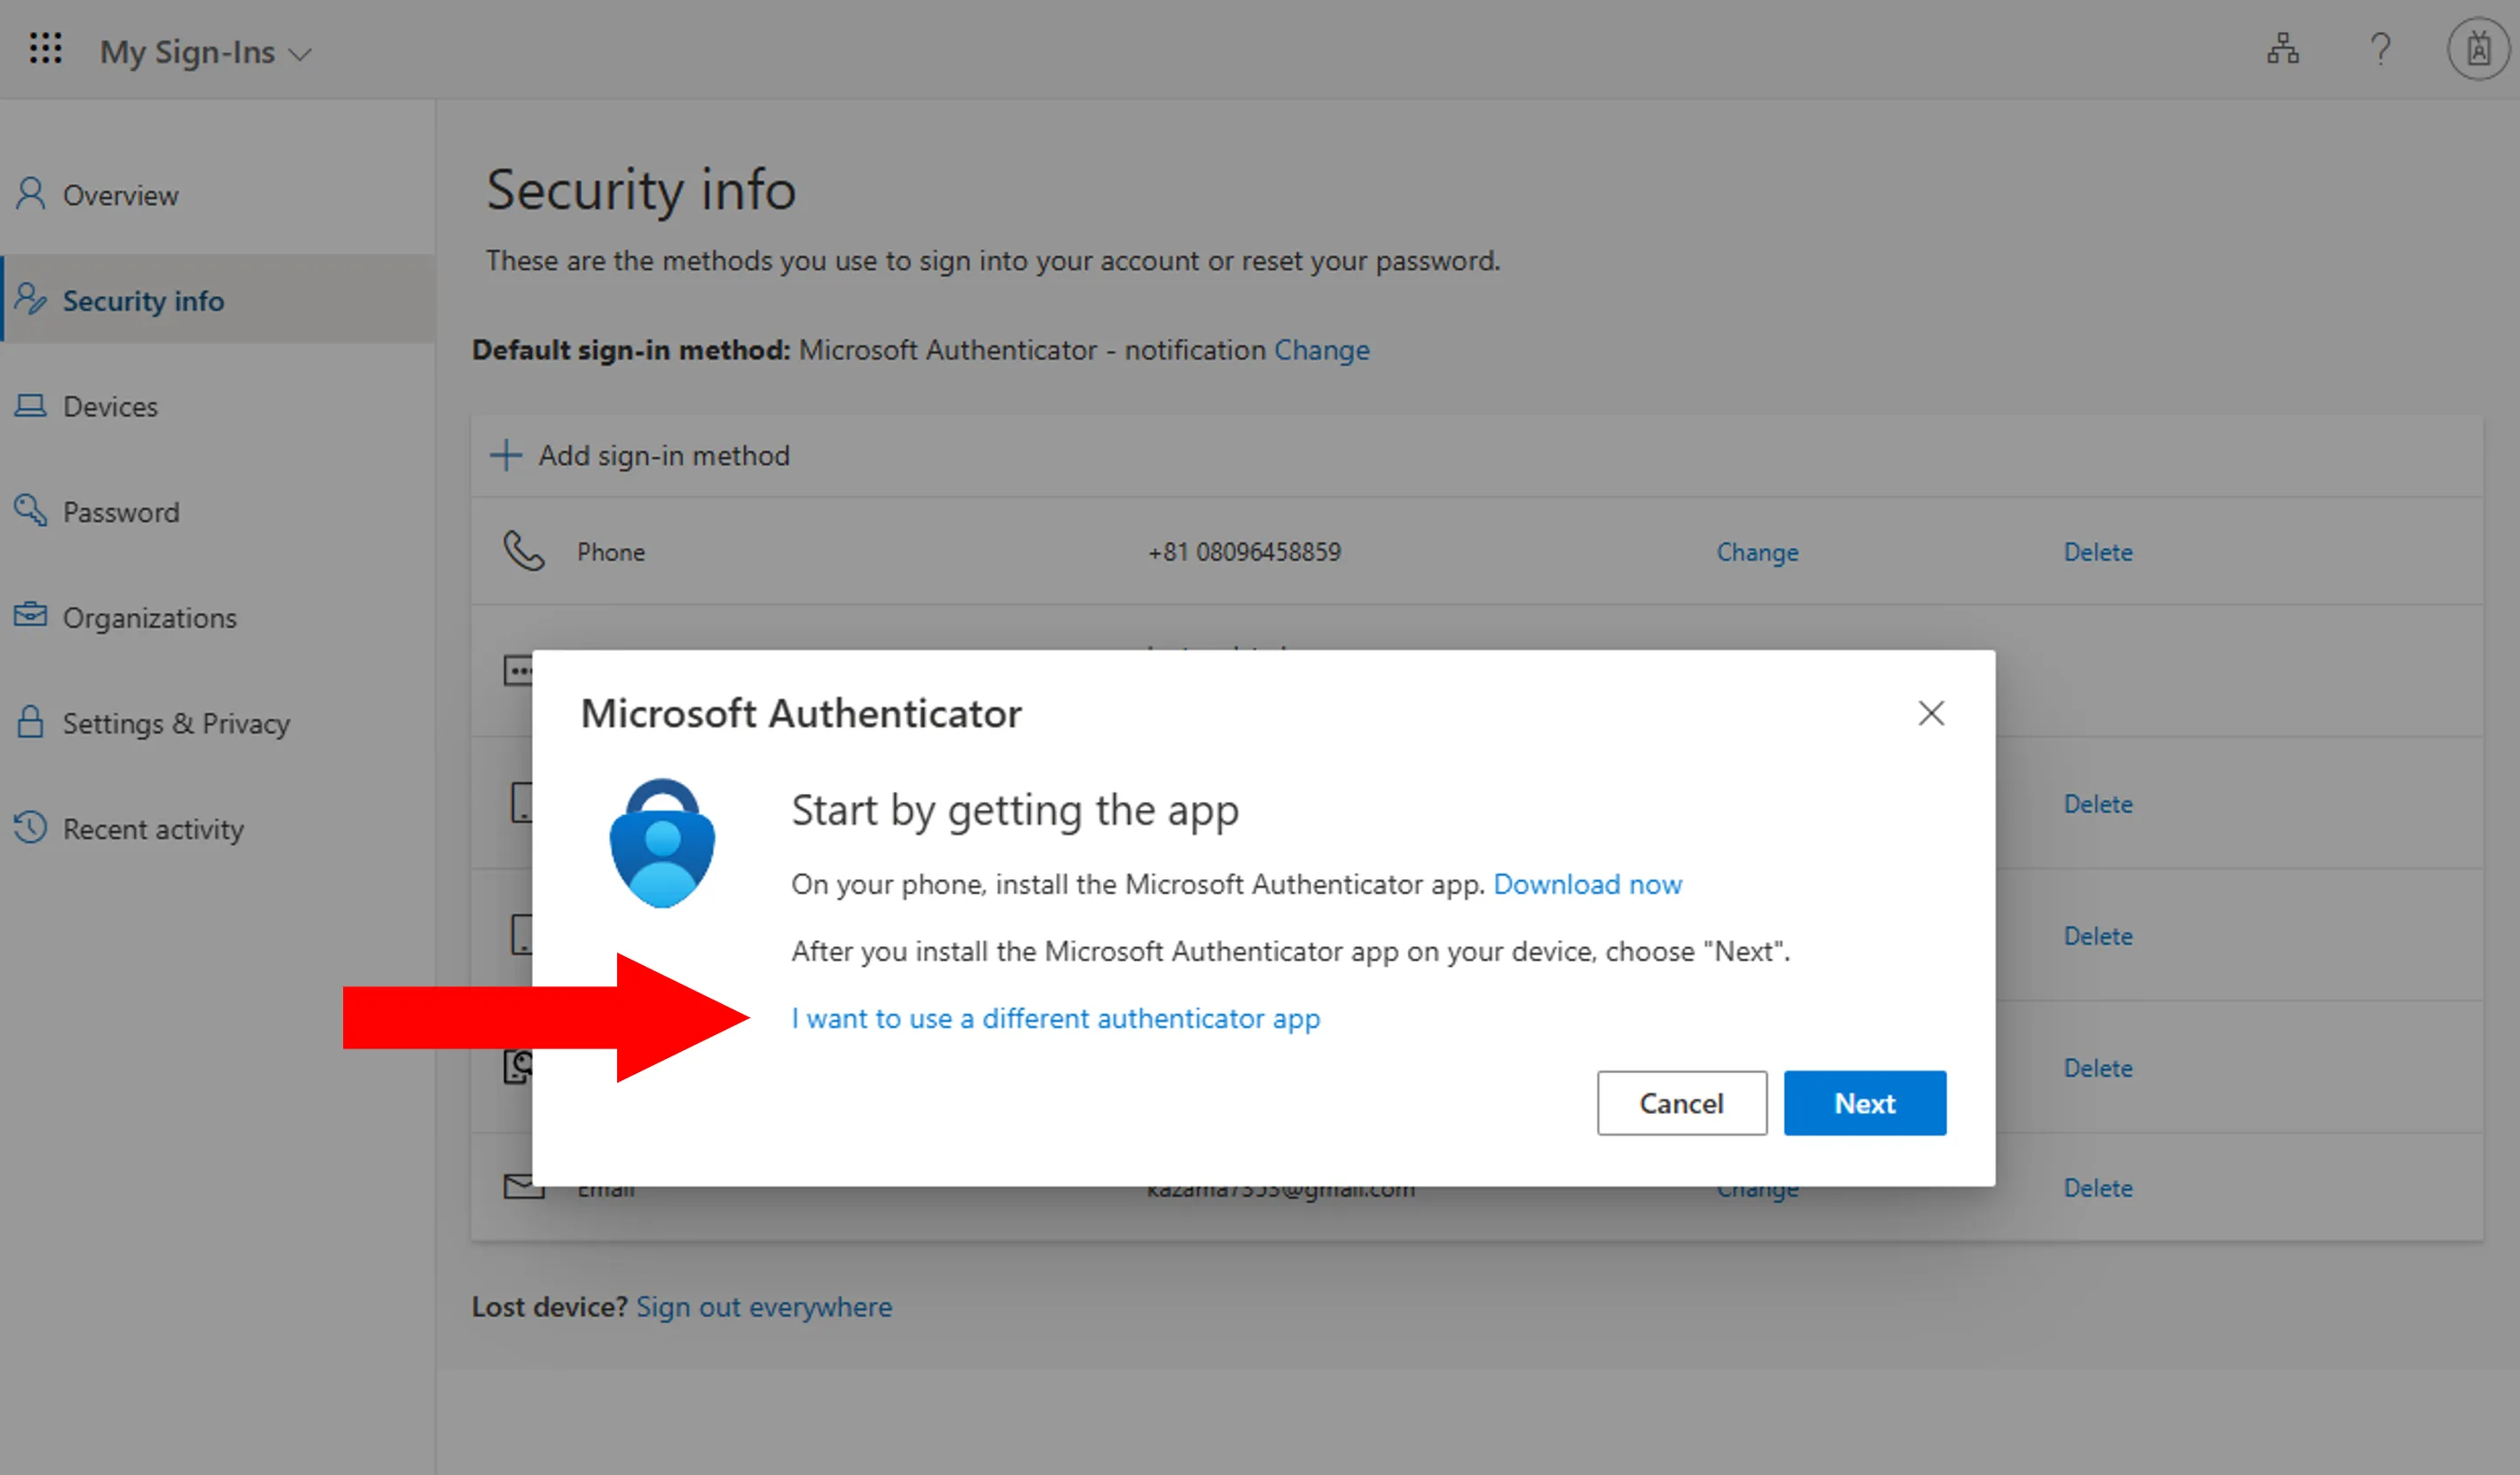
Follow the instructions until you reach the QR code page. Scan the QR code with your authenticator app and complete the setup procedure. If you want to use YubiKey and Yubico Authenticator app, see “Instructions on how to use the Yubico Authenticator for the Multi-Factor Authentication of UTokyo Accounts” page for details.
Open Security info page.
Click “Add sign-in method”.

For “Add a sign-in method”, select the type of phone you want to add.
You can register one number for each type of phone: "Phone", "Alternate Phone" and "Office Phone".- Phone: The phone you usually use. You can select text or phone call for the method to verify. If you have selected phone number in the initial setup, the number has been registered as "Phone".
- Alternate Phone: A substitute phone such as your home phone. Only phone call verification is available and you cannot select text.
- Office Phone: A substitute phone of your company. Only phone call verification is available and you cannot select text. Unlike the others, you can register an extension number.

For “What phone number would you like to use?”, select the appropriate country code (+81 for Japan) and input your phone number. Also, if you chose “Phone” for the type of phone, choose to either receive a text message with a verification code (“Text me a code”) or a phone call (“Call me”).
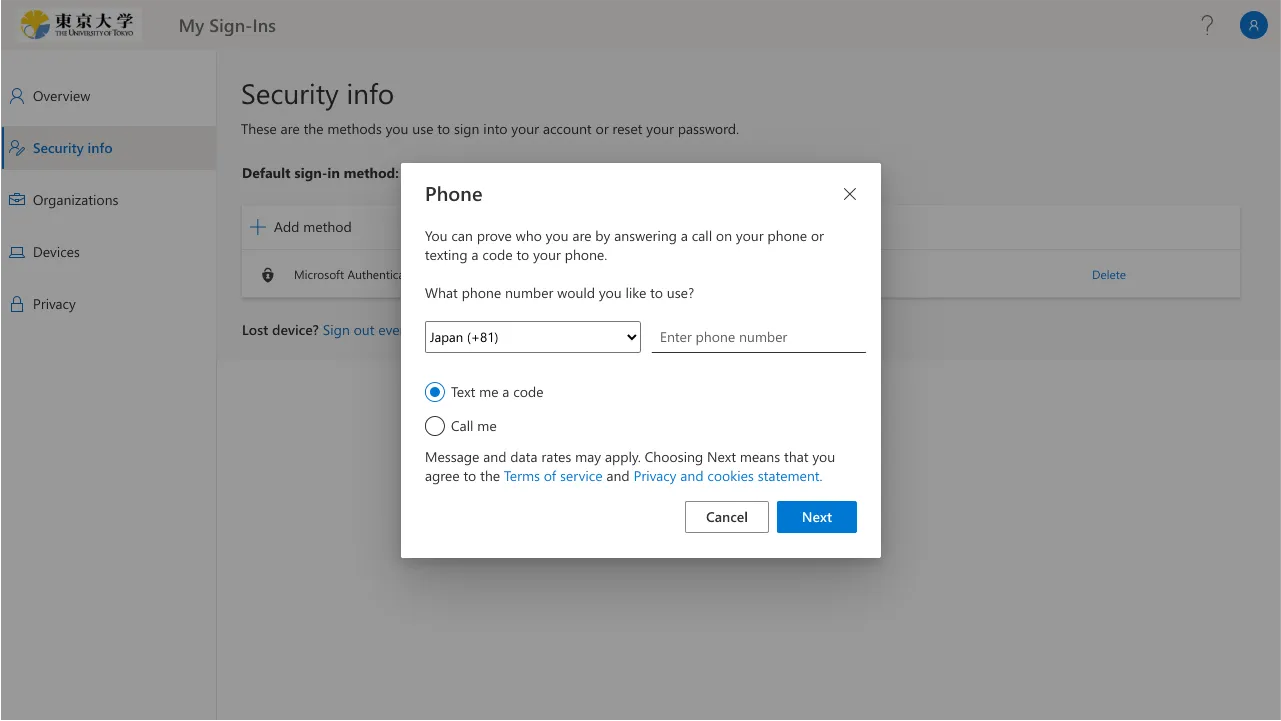
You will receive a text or call on your phone to verify your identity. If you selected “Text me a code”, you will receive an SMS message with a 6-digit verification code. Input the code in the setup page. If you selected “Call me”, you will receive a phone call asking you press the pound key (#) on your phone to verify your identity. Press the key and end the call. (To display the pound key on your smartphone during the call, press the “keypad” button.)
For details on the FIDO security key registration procedure, please refer to How to use FIDO security key for Multi-Factor Authentication for UTokyo Account (in Japanese).
In the screen that appears after clicking “Add method”, “App password” and “Email” will also show up as choices for “Which method would you like to add?”. However, please be aware that these cannot be used for identity verification upon sign-in (they are for other purposes).
Step 3: Try Signing In
The next step is to check that you can sign in to your UTokyo Account using MFA.
- Access the UTokyo Account Sign-out Page.
- Wait for the “You signed out of your account” message to appear.
- Access the Security info page.
- Enter your UTokyo Account username and password in the sign-in page.
- Verify your identity using MFA. The procedure differs by the verification method you use. Please follow the instructions on your screen.
- Microsoft Authenticator: A notification will be sent to your phone asking you to enter the two-digit numbers displayed on the sign-in screen.
*About the “I can’t use my Microsoft Authenticator app right now” message
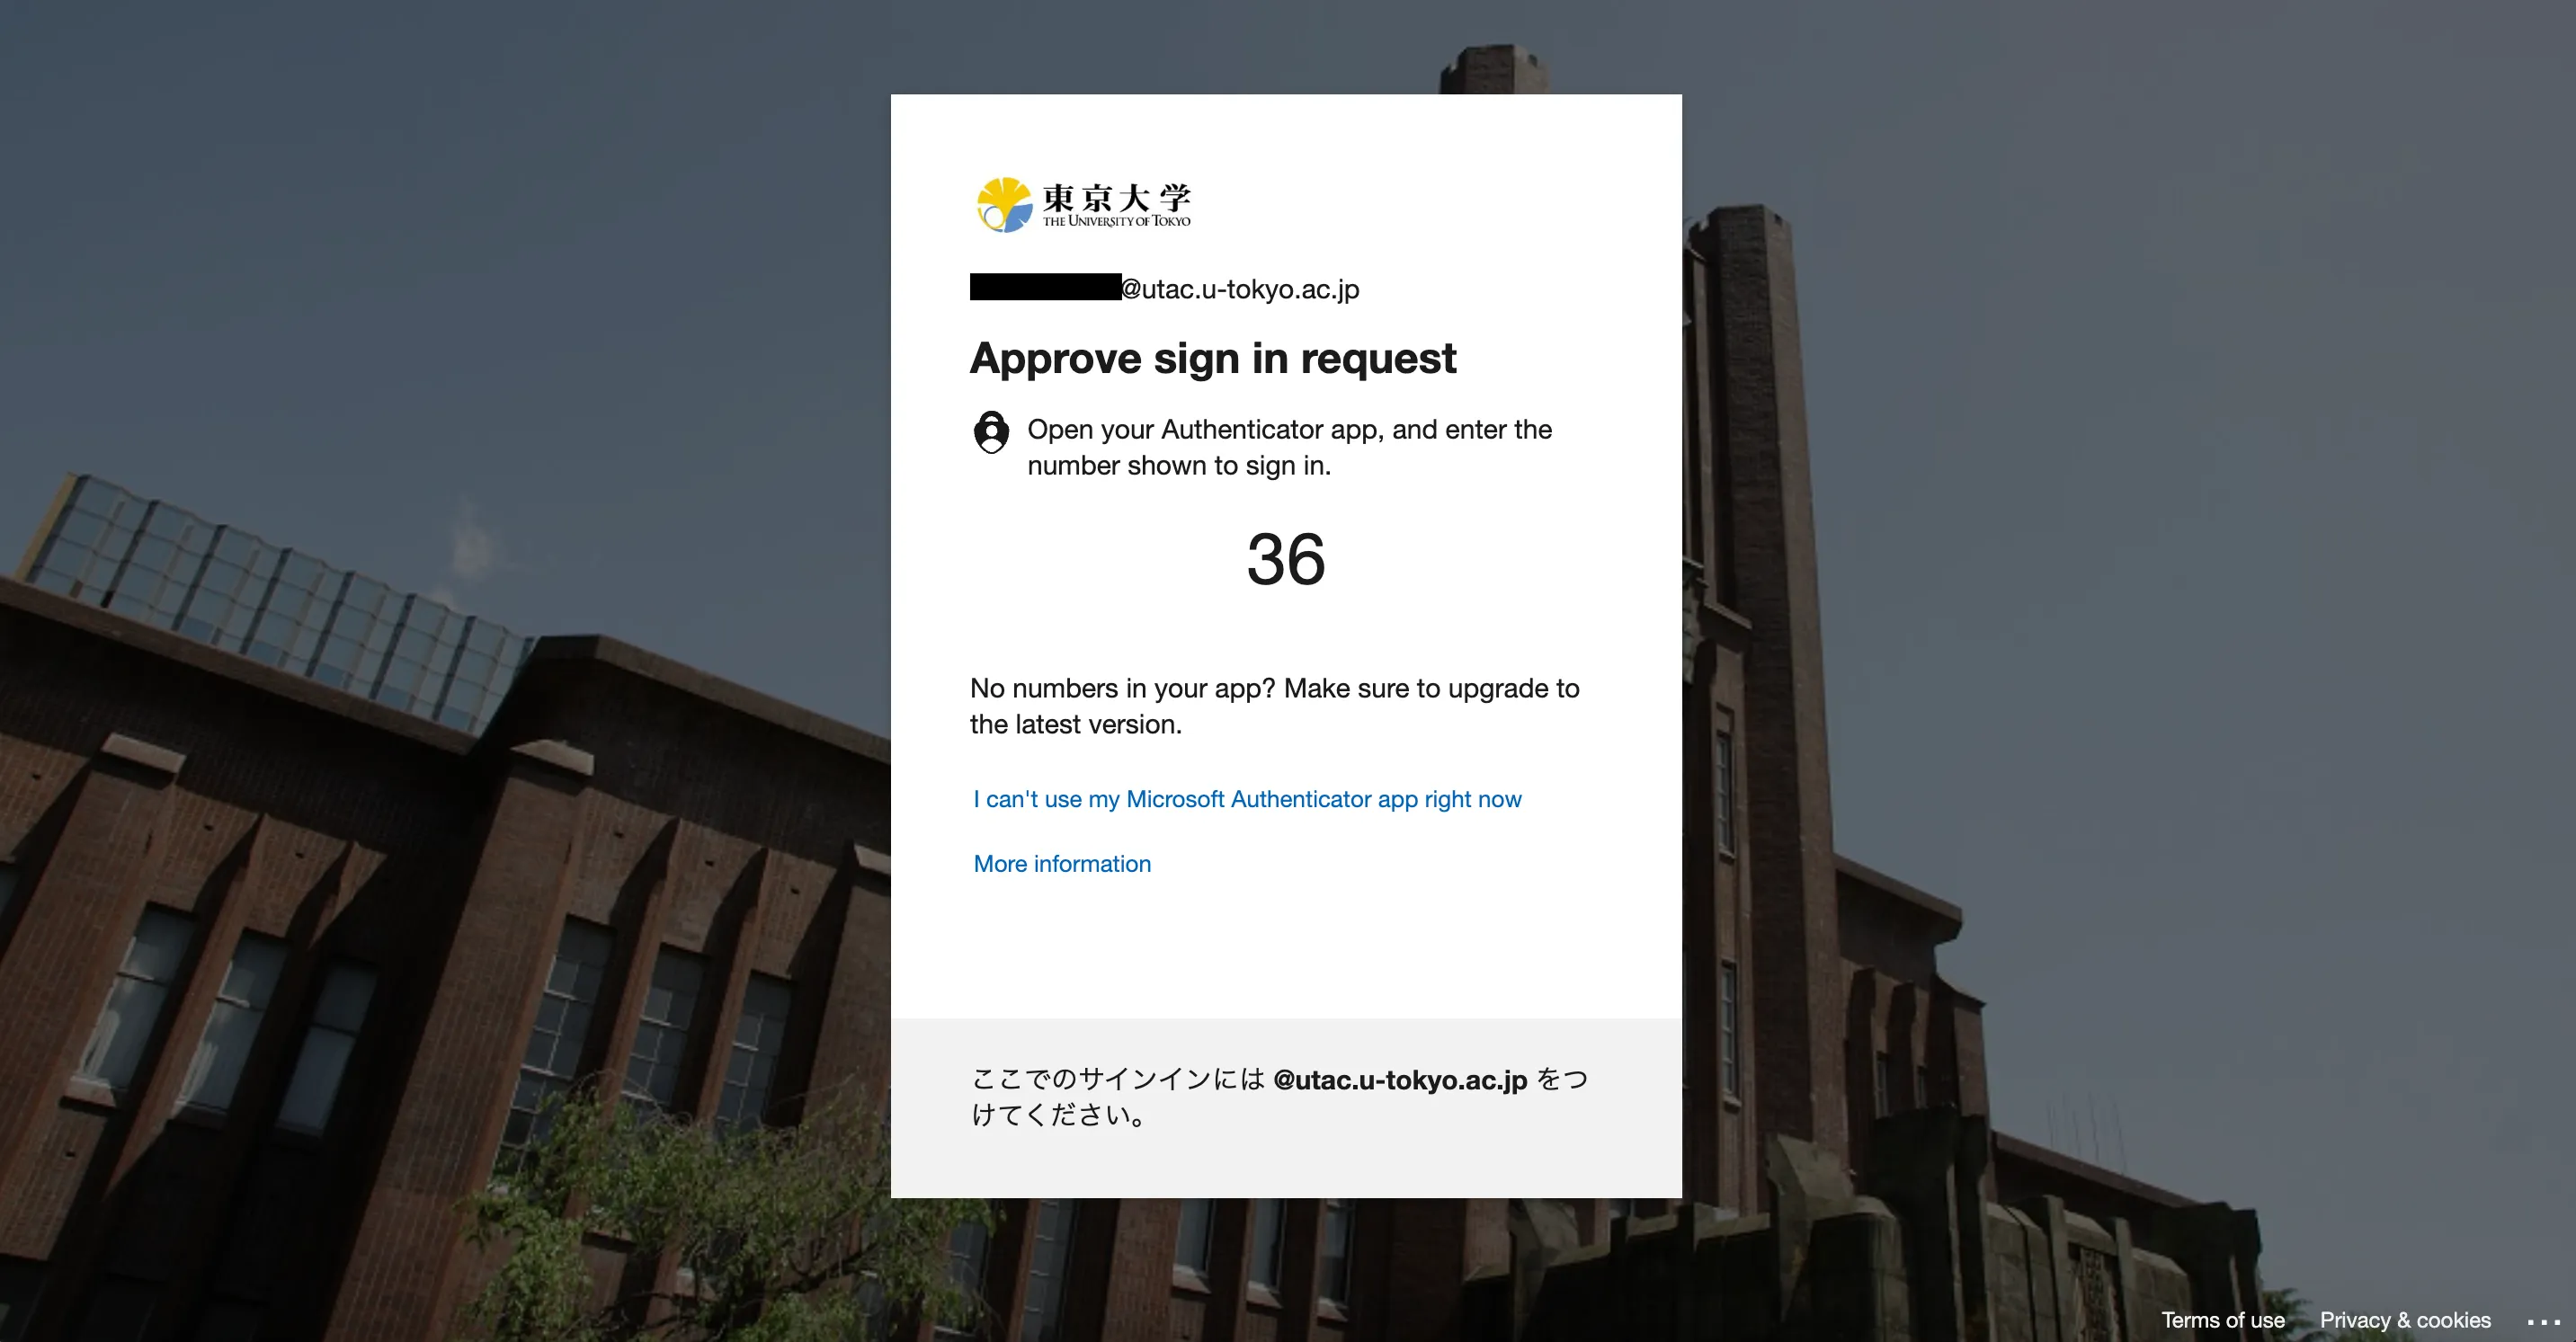 The “I can’t use my Microsoft Authenticator app right now” message does not mean that the MFA system using the app is unavailable. Press the message when you do NOT have access to the app.
 - Other Authenticator Apps: You will see a 6-digit code for your account in the authenticator app. Enter the code in the sign-in page.
- Phone Number (verification via SMS): An SMS message with a 6-digit code will be sent to your phone. Enter the code in the sign-in page and click “Verify”.
- Phone Number (verification via call): You will receive a phone call, asking you to press the pound key (#) on your phone. Press the key and end the call. (To display the pound key on your smartphone during the call, press the “keypad” button.) ※A phone capable of tone dialing is required.
If you want to use a verification method not displayed
One of the added verification methods (usually the first method added) will automatically become your “default sign-in method”. When you sign in, the system will ask you to verify your identity using the default sign-in method. If you wish to sign in with a different method, click the “Use a different verification option” or “I can’t use my Microsoft Authenticator app right now” link.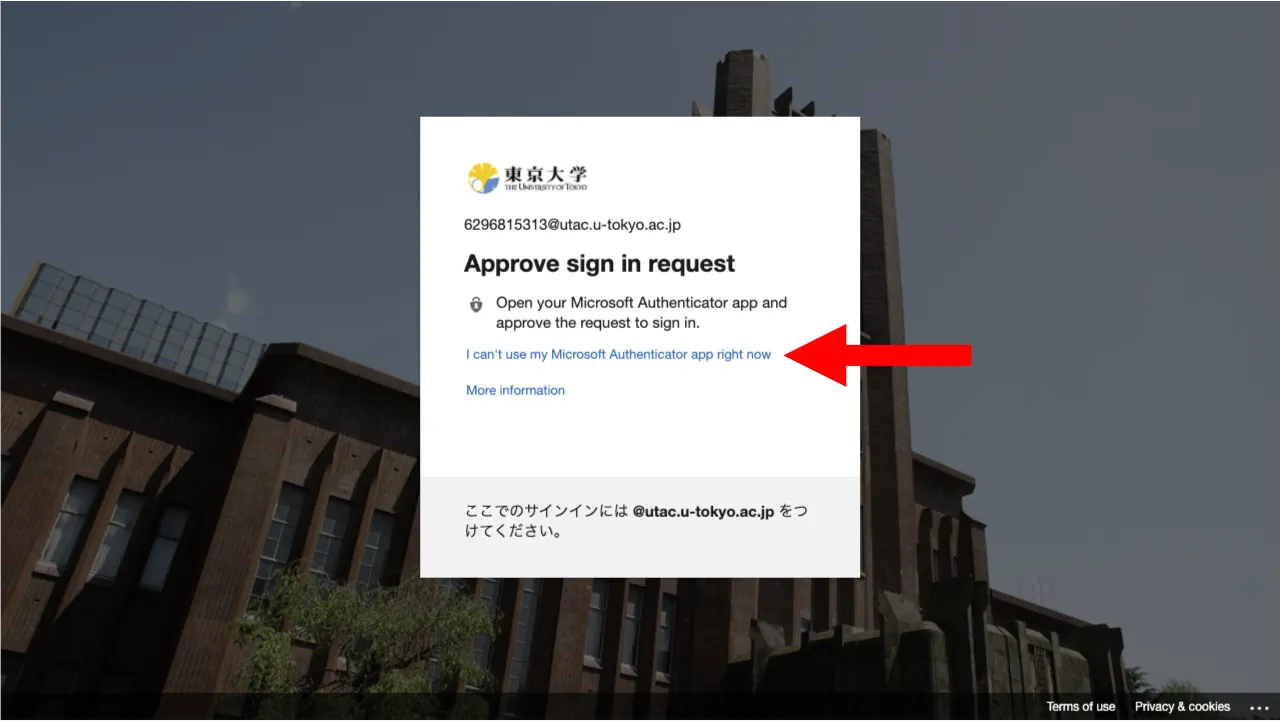 The default sign-in method can also be changed by following the procedure described in the “Changing the Default Sign-in Method” page.
 - Microsoft Authenticator: A notification will be sent to your phone asking you to enter the two-digit numbers displayed on the sign-in screen.
- If you are then taken to the “Security info” page, you have successfully signed in.
The setup process is not over. Continue to Step 4.
*If you could not complete this Step 3 properly, do not proceed to Step 4. Contact the Technical Support Desk.
Step 4: Apply for starting your UTokyo Account
The final step is to submit an application for starting your UTokyo Account. Once you submit this application, you will be asked to verify your identity with the process in Step 3 whenever you sign in to your UTokyo Account.
If the remote-access environment (Citrix Workspace) of office work devices for administrative staff is being used, it will be disconnected once you apply for the MFA. Before moving on to the following procedures, please make sure you are signed out.
- Access the UTokyo Account User Menu.
- Sign in with your UTokyo Account if prompted.
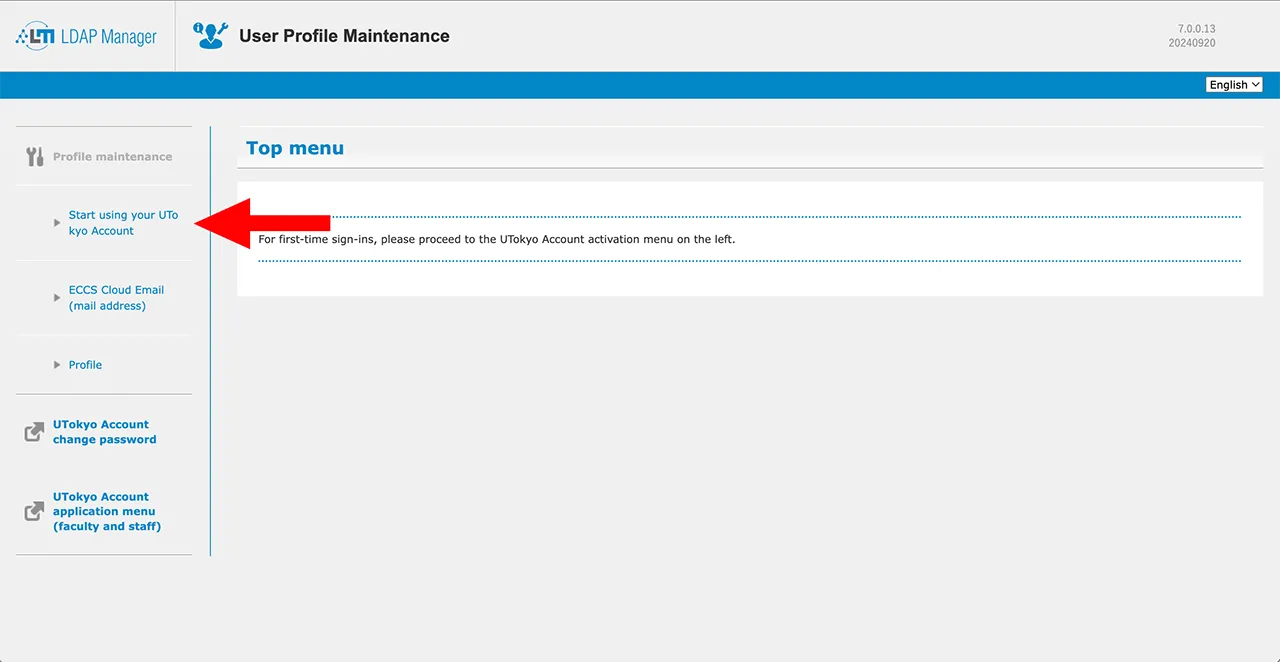
- Click “Start using your UTokyo Account” in the left menu.
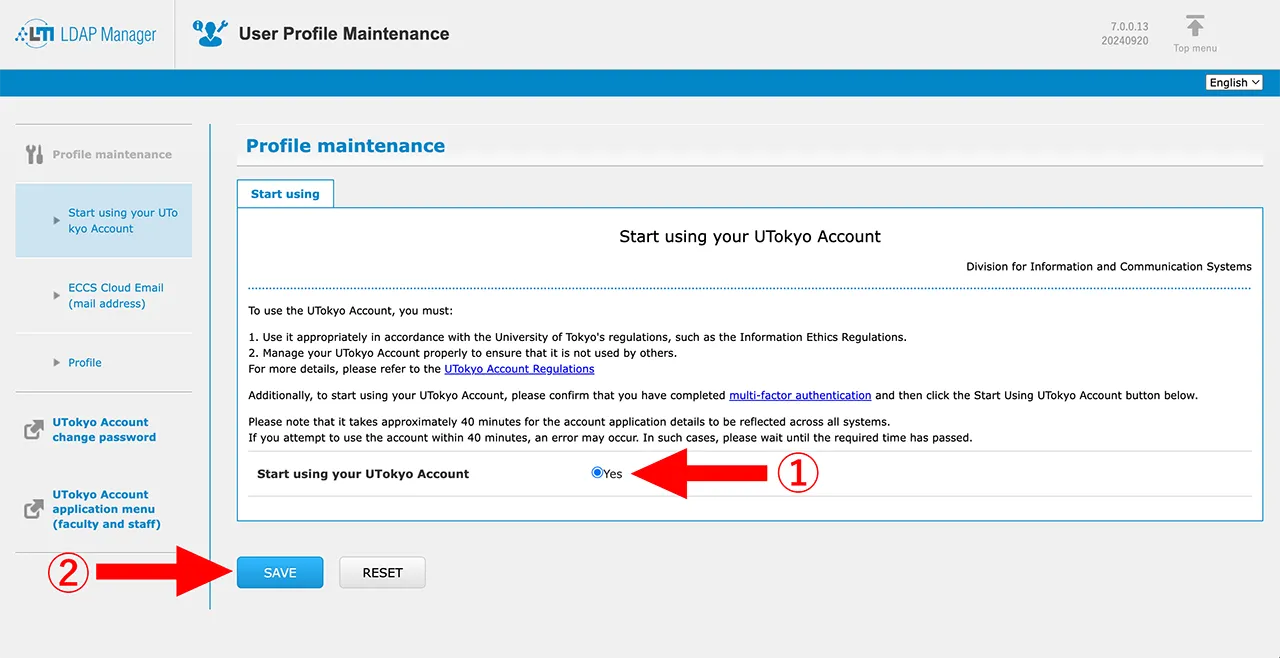
- Read the UTokyo Account instructions carefully, and find “Start using your UTokyo Account” at the bottom of the page. Answer “Yes” and click “SAVE”.
You have completed the initial setup procedures for UTokyo Account, but it will take about 30 minutes for the account settings to be reflected in the system after these procedures. If you want to use systems that do not allow you to sign in until the multi-factor authentication settings are completed, please be patient and wait for a while.
Things to Keep in Mind after Completing Initial Procedure
Once the MFA is enabled, you will be asked to verify your identity with the SMS or authenticator apps you registered every time you sign in to your UTokyo Account. Be well aware that if you lose access to the registered verification method (smartphone apps, phone number, etc.), you will be unable to sign in to your UTokyo Account.
In particular, when you get a new phone, register the phone for MFA by following the procedures in “Changing the Verification Method of Multi-Factor Authentication for UTokyo Accounts” while your old phone is available. Once your old phone is disposed of, you will no longer be able to verify your identity with the authentication app using the old phone. In addition, if you change the phone number, the verification with your former phone number will be impossible. Since you need to sign in to the system with your old verification method even when you change the method, it is important to switch your verification method while your old phone is available to avoid being completely locked out of your UTokyo Account.
If you are in trouble in using your UTokyo Account and the MFA, you need to “re-registration MFA”. Please visit “Reregistering Verification Method for UTokyo Accounts” for more information.