This page explains how to use UTOL as a student enrolled at UTokyo. For instructions on how to use UTOL as a course instructor or TA, please refer to the “Using UTOL as a Course Instructor or TA”.
First, we will describe how to check your courses in the timetable and calendar format, and then how to view the course information as well as how to use the functions for assignments, handouts, and other materials (contents). Finally, this will explain how to list or search the contents of the courses you are taking and how to search for them.
Checking Registered Courses
After logging in, you can check the courses you have registered for as a course instructor, TA, or enrolled student on the top page of UTOL.
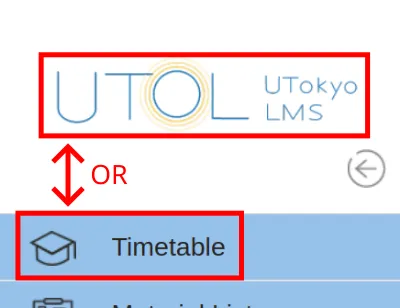
You can also access this screen by clicking the UTOL logo in the left menu (the menu on the left-hand side when you press ![]() in the top-left corner) or by clicking the “Timetable” button.
in the top-left corner) or by clicking the “Timetable” button.
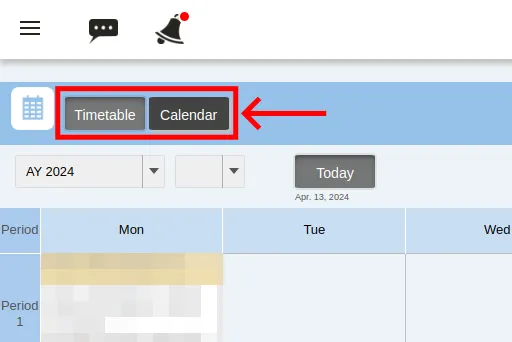
Courses can be displayed in a timetable or calendar format. You can switch between the two using the buttons at the top of the screen.
Courses for which the contents use is limited to course registration or course instructor registration will not be displayed unless the conditions for the content use are met even if the student has registered for the course. For this reason, courses that were previously displayed may no longer be displayed if the course registration deadline has passed or the conditions have changed due to a change in the settings.
For information on the conditions for using the contents, please refer to “Notes on course registration”.
Timetable
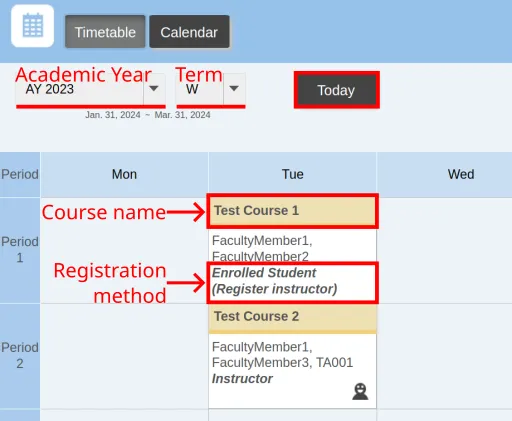
- Displaying term
- You can view courses for the previous year or term by switching between “Academic Year” and “Term” at the top of the screen.
- Clicking the “Today” button will display the timetable for the current term.
- Class sessions: Click on the course name to move to the course top page (course details screen).
Registration method: Your level of authorization as a course instructor, course designer, TA, or enrolled student and how to register will be displayed.
- Class cancellations / make-up classes / classroom changes information
- Information on canceled classes, etc., linked from UTAS is displayed.
- As the link to UTAS is made only once a day, any registrations or cancellations made on the same day will not be reflected.
Calendar
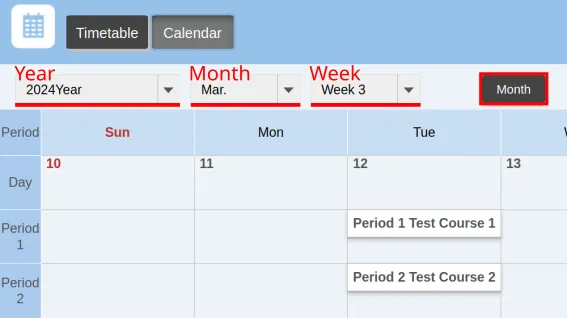
- Period being displayed
- You can change the period displayed by switching between “Year”, “Month” and “Week” at the top of the screen.
- Information for a “Week” will only be displayed if you set the display to show weeks.
- Courses before W term 2023 are not displayed.
- You can change the period displayed by switching between “Year”, “Month” and “Week” at the top of the screen.
- Weekly view / Monthly view
- You can switch to the weekly or monthly view by pressing the “Week” or “Month” button.
- Class sessions: Click the course name to go to the top of the course.
- Class cancellations / make-up classes / classroom changes information
- Information on canceled classes, etc., linked from UTAS is displayed.
- Click the text section to move to the corresponding screen on UTAS to view the details.
- As the link to UTAS is made only once a day, any registrations or cancellations made on the same day will not be reflected.
- Class cancellations / make-up classes / classroom changes information
Viewing course information
When clicking the course name in the Timetable or Calendar, the course top page will open (for more information, please refer to “Checking which courses you are registered for”).
The Course Top screen displays an overview of course information, such as assignments and course materials.
Course Registration
Usually, courses registered through UTAS1 are automatically registered, but some courses require manual registration.
For more information, please refer to “Registering for courses in UTOL (for enrolled students)”.
Notifications and Updates
The UTOL’s notification function includes “Updates”, which automatically notifies you when there are updates to course materials, and “Notifications”, which are registered by your course instructor.
You can set whether or not to receive these notifications for each course. For more information, please refer to “Settings to receive notifications in the UTOL”.
Attendance
For classes for which attendance is taken on UTOL, please register your attendance according to “Registering attendance” below.
Please note that the method of taking attendance and managing attendance differs from class to class, so if you have any concerns about this, please consult your course instructor.
Registering attendance
- Click the “Submit Attendance” button at the upper part of the course top screen.
- Enter the attendance password instructed in the class and click the “Send” button.
If the time designated by your course instructor passes, you will be registered as “Late”.
Checking past attendance status

Status of past attendance is displayed in the “Attendance” column at the bottom of the Course Top screen in the form of “Present”, “Late”, “Absent” and so on.
Labels

The label is a function that filters the contents displayed on the Course Top screen by the relevant groups. Labels must be assigned in advance by your course instructor (enrolled students cannot create or edit labels).
If you select the label you want to display from the pull-down menu at the upper part of the Course Top, only the contents with that label will be displayed. If you select “ALL”, all contents will be displayed.
Course materials
Materials, such as course materials, are displayed in the “Course Materials” section on the Course Top screen.
The publication period is set for course materials and will sometimes end before the examination. Therefore, please check the publication periods carefully.
Messages and Forums
The functions for messages and forums allow you to communicate with your course instructor, TA, or other students taking the course. Messages can only be viewed by the person you specify as a recipient or your course instructor. However, posts on the forum can be viewed by all participants in the course.
For more details on the function for messages, please refer to “Using the message function in UTOL (for enrolled students)”.
Assignments, Quizzes, and Surveys

Assignments, quizzes, and surveys are all created by your course instructor (except for class surveys) and are displayed in the respective columns on the Course Top screen. Clicking the respective title will take you to the submission • response screen, where you can submit or answer it.
If you press ![]() on the right-hand side, you can view the results of the quizzes or surveys. Please note that some items may not be displayed as they are set to be displayed or hidden by your course instructor.
on the right-hand side, you can view the results of the quizzes or surveys. Please note that some items may not be displayed as they are set to be displayed or hidden by your course instructor.
Even if you press the “Submit” button for an assignment, there may be cases where the submission process is not completed correctly due to various reasons, such as network issues, resulting in the assignment not being submitted. Please check the following when submitting:
- After submitting the assignment, make sure that the message “Submit is completed” is displayed.
- If this message does not appear, the submission may not have been successful. Please try submitting again.
- After submission, confirm that the “Submission Status” column on the course top page shows that the assignment has been submitted, and also check that the submitted file has been uploaded by clicking on the title.
Once an instructor has graded or added comments to a submitted assignment file, you will no longer be able to delete that file. If you need to resubmit, please rename the file and re-upload it, or ask the instructor to delete the existing file.
Class Surveys
The class surveys conducted by some departments are anonymous and have unique features.
- They are not displayed in the “Submission status list”.
- You cannot view or correct your answers.
- Your course instructor can view the total results but not your comments or the names of the enrollees who have answered the survey.
Function for No Submission Required
The function for No Submission Required prevents assignments, quizzes or surveys that do not need to be submitted from being displayed on the “Submission status list”.
You can set everything to be all “No Submission Required” within the course or individually.
Setting an entire course to no submission required in batch
To set an entire course to “No submission required”, check the box “Do not submit assignments, tests, or questionnaires in this course” at the upper Course Top screen.

If you uncheck the box, the items will reappear in the submission status list. Items that have been made submission-free individually will continue to be not displayed.
Setting individual Assignments, Quizzes and Surveys to no submission required
You can set individual assignments, quizzes and surveys to “No submission required” or cancel it.
Please note that you cannot cancel assignments that have already been submitted. Also, if you have set the entire course to no submission required, you cannot then individually change them back.

- Click the “Not Submitted” (or “No Submission Required”) button in the “Submission status” column.
- When the dialog box opens, click “Not Submitted” (or “No Submission Required”) button.
Listing or searching for courses
This section explains how to list and search for information provided by the course you are taking.
The list of notifications and updates can be viewed from the bar displayed on the above screen.
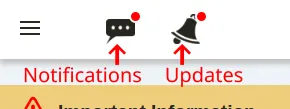
The list and search of other items can be found in the left menu (the menu that appears on the left side of the screen when you press ![]() at the top left corner).
at the top left corner).
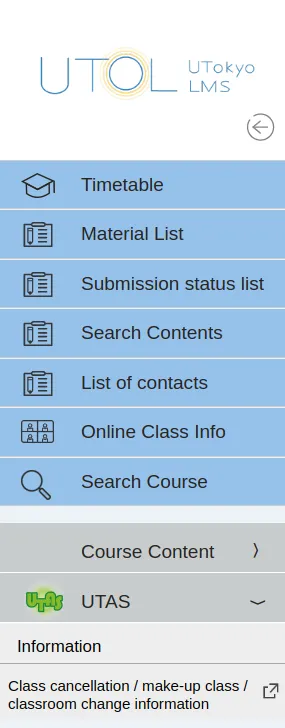
List of Notifications & List of Updates
In the list of Notifications or Updates, you can display a list of notifications and updates for the courses you are taking.
When there are unread information or unread updates, the icon on the bar on the upper screen will have a red circled attached. When the icon is pressed, a box will open, and the unread notifications will appear.

To view notifications you have already read, click the “Notification list” or the “Updates list” in this box and select “All” or “Read”.

Material List
The current course materials for the course you are taking are displayed.
Submission status list
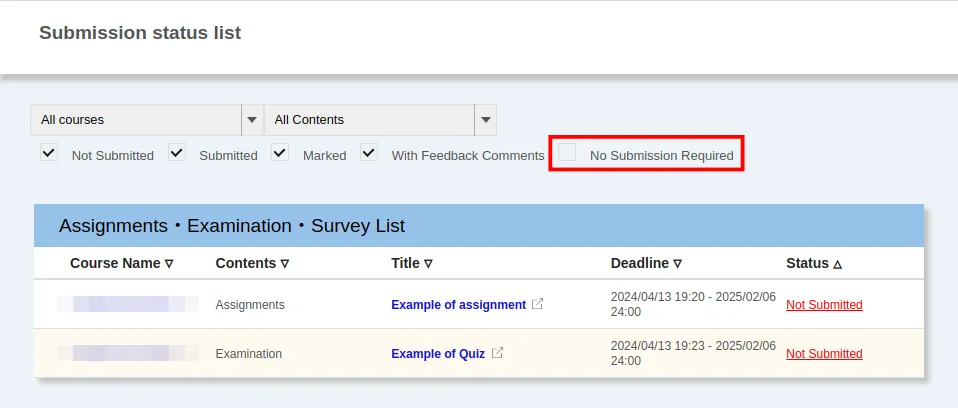
Assignments, quizzes and surveys that are currently required for the course you are taking are displayed.
The items that are set to “No Submission Required” are not displayed by default, however, they will be displayed if you tick the “No Submission Required” checkbox on the “Submission status list” screen.
Please note that class surveys are not displayed.
List of contacts
Messages addressed to you are displayed.
Online Class Info
The “Online course information” for the course you are taking are displayed all together.
Search Contents
You can search contents for course materials, assignments, quizzes, and surveys for your course.
Searching for Courses
Course Search is a function that allows you to search for courses on UTOL and can be used to find courses to register for. You can also search for past courses from AY 2019 onwards.
For details, please refer to “Searching for courses in UTOL (for enrolled students)”.
Details on functions for enrolled students
For more detailed information on individual functions, please refer to the following pages.
- Registering for courses in UTOL (for enrolled students)
- Searching for courses in UTOL (for enrolled students)
- Using the message function in UTOL (for enrolled students)
-
If you register for a course before the deadline, courses you have registered as favorites will also be automatically registered for you. ↩